Saturday, November 23, 2013

Pasta Bake


Pasta Bake - this is a meal that will make the whole family happy.  I actually can't think of anyone that doesn't like pasta and this is a dish that you can expand if you suddenly find yourself not two for dinner, but six - this happens to me quite often!  I usually have some bolognese sauce in the freezer and you only need a portion for two to make a dish that will feed six to eight.  You will probably realize that these are the same ingredients for a traditional lasagne - this is just a bit quicker and easier to prepare.

I am currently in Sydney for the birth of grandchild number seven - a beautiful brother for two year old Taj and, of course, grandma is on cooking duties.  It's not always easy to find dishes that please the whole family but this is certainly one that is often requested - from tiny children to big people.
Two year olds love their new brothers' ears and pasta bake!

You will need three things:  A portion of bolognese sauce, some kind of tube pasta (I use penne) and some bechamel sauce.  There must be as many recipes for bolognese sauce as there are Italians, but this is mine.

BOLOGNESE SAUCE
500 g good quality minced beef (I actually prefer a mixture of pork and veal, but it's not always available,
 so beef will do).
1 large brown onion, peeled and chopped finely
1 stick celery, chopped finely
2 cloves garlic, crushed
1 400 g can chopped Italian tomatoes
1 720 ml jar passata (pureed tomato)
2 bay leaves and one sprig fresh thyme
1 glass red wine (don't worry about giving alcohol to children as it cooks off - its just for flavour and colour)
3/4 cup of extra virgin olive oil
Seal salt and freshly ground black pepper

  • Heat half the oil in a heavy bottomed, wide saucepan or casserole dish. 
  • NOTE: This may seem like a lot of oil, but this is one of the keys to success of making a good bolognese.  It makes the sauce luxuriously thick that nicely coats any pasta.
  • Cook the onion until just turning colour, remove from the pan.
  • Now brown the mince until the juices have come out and then evaporated.
  • Add the remainder of the oil and then celery, tomatoes, passata, garlic, herbs, wine and salt and pepper.
  • Simmer slowly for at least 11/2 hours - the oil should rise to the surface. Give it a stir, every now and again, to prevent it sticking.
  • NOTE: If you need to go out, you can cook it in the oven like a casserole - it actually takes on a richer flavour.
  • NOTE:  This makes 3-4 portions for meals serving 2 people.  You will need one portion for the next step in this recipe and you can put the rest in the freezer for another day.

Bolognese sauce - enough for 3 meals, that has been cooking for about an hour and a half; penne on the boil and the bechamel sauce.
PASTA
  • Heat your oven to 180oC
  • Bring enough salted water to the boil to adequately cover the amount of pasta you need to cook - this will depend on how many people are coming to dinner. 
  • Cook the pasta until al dente - chewy, but not sloppy.  Use a large saucepan or casserole dish that you can transfer to the oven - I'm saving you washing up here!

BECHAMEL SAUCE
50 g butter, melted in a saucepan - be careful not to let it burn
1 tbs plain flour
500 ml fresh milk
salt and white peppper
1/4 tsp grated nutmeg
1/2 cup parmesan cheese

  • Add the flour to the melted butter and stir on a low heat until it makes one clump - this is called a roux.
  • Take off the heat and whisk the milk into the roux.
  • Return to the heat and cook until it thickens - should coat the back of your wooden spoon.
  • Add the nutmeg and salt and pepper to taste.

Penne with the bolognese sauce added and bechamel about to go!

ASSEMBLING THE PASTA BAKE

  • Stir the bolognese sauce through the cooked pasta.
  • NOTE: If you want it to even further add any of the following: another can of tomatoes, sliced mushrooms or pre-cooked grilled peppers.
  • Pour the bechamel sauce over the top
  • Sprinkle with parmesan cheese
  • Cook in the conventional oven for 15-20 mins on 180oC then turn to grill part of oven to 'golden' the top for 5 minutes. 

Tasty, simple and nutritious meals for all the family - pasta bake

Wednesday, November 20, 2013

Propagating Cuttings

Making New Plants from Old - It's Fun, Free and Easy.
(Or, how to share your garden with everyone!)

When I was a child, just about every garden was made from other plants -  everything was propagated. The Aladdin's Cave of  21st century garden centres were not around and besides, folk just didn't have the money to buy lots of plants.  When family and friends came to visit they generally brought with them something special from their gardens - a prized plant; cuttings, bulbs and seeds - usually wrapped up in a piece of newspaper for my dad to nurture and perpetuate in our garden.  (The first thing these people would do on their next visit would be an inspection of their 'baby' to make sure my dad hadn't managed to kill it!  We had a lot of 'accidental deaths' with dahlias as my dad couldn't stand them!) )

The beautiful Gardenia magnifica - flowering in all its glory in my garden right now and struck from a bunch of flowers I received about ten years ago.  I have propagated about 5 of these bushes for my garden, and have made many more for friends and family - all from one bunch of flowers!

I seem to have morphed into my parents!  They have had a plant stall outside their place for years selling produce from their garden, and now I have one outside mine, mainly selling plants that have all been propagated from things in my garden.  I have come to realize that, actually, some of my favourite times in the garden are the hours I spend propagating - I find it very creative and deeply satisfying.

FACT:  First of all, a word about SEEDS v CUTTINGS.  SEEDS are the children of the plant and, like children, they will all be similar to the parents, but different - some more different than others.  With CUTTINGS you are getting an exact copy of the parent plant - like a clone. This is useful if you want the plant to look exactly the same as the parent plant OR if seeds are hard to come by - as with plants like camellias, gardenias and many other ornamental shrubs.
Semi-hardwood camellia cutting

STEP 1: Select the plant that you want to take cuttings from. Do this on the day that you are going to strike them as cuttings will always take better if they're really nice and fresh and from the healthiest, best material off the parent plant. I usually do this in the morning before the day gets too hot.
Camellia cutting prepared for planting - note the cut-off at the bottom just below the node. 

There are three types of cuttings:
  • Soft wood cuttings, from stems that still bend and move (like my rosemary cuttings and the grevilleas pictured below)
  • Semi-hardwood cuttings, from stems that are slightly firmer and stiffer (like gardenias and camellias)
  • Hardwood cuttings, from stems off deciduous plants when they're completely dormant, generally taken in mid-winter (like roses and deciduous trees)
    Small-leaved grevillea cuttings.  This is a soft-wood cutting.
STEP 2: You will need the following:
  • Propagating medium. You want a fine free-draining mix that will fit snuggly around the cuttings.  I use sieved soil, compost and some perlite/vermiculite.
  • A really good, sharp pair of secateurs.
  • Propagating hormone. Either hormone powder or the liquid or gel version, which is particularly good if the cutting is from a plant that bleeds sap as it seals the whole cut. You can even use honey. All these products help stimulate callous tissue that will then encourage the cutting to produce roots.
  • A dibbler. This can be a pencil or a chopstick.
    Grevillea cuttings prepared for planting with two-thirds of the lower leaves removed
STEP 3:
  • Make your cuttings about 15cm long, look for a node where the bud or a leaf scar was and make a clean cut just below it. A node is the spot that has the greatest concentration of growing cells - i.e. able to produce roots.
  • Remove about two-thirds of the lower leaves by simply running your fingers down the stem.
  • Pinch out any sappy, green growth at the top of the cutting and remove any flowers, fruit or seeds.
  • You will end up with a cutting about 10cm long.
    Grevillea cuttings potted up
NOTE:  When you are propagating from cuttings you want the plant, initially, to put all its energy into making roots - not leaves, flowers or fruit.  That's the reason why most of the leaves are removed.

TOP TIP: If the leaves on a plant are really large - cut the leaves in half as it allows you to put more than one cutting in a pot. It also reduces transpiration of the cutting allowing it to put all its energy into producing roots.
Rosemary cuttings that have already taken root and are now ready to be potted up or planted directly into the garden.

STEP 4:
  • The next step is to get the dibber and make a hole for the cutting in the propagating mix. You should never just push a cutting into the propagating mix as you may damage the cambium tissue, as well as push away any of the hormone product you have on the cutting.
  • Once all the cuttings are in place, water them in well. In the coming weeks, make sure the pot is kept moist. This can sometimes be aided with either placing a plastic bag or drink bottle over the top of the cutting, creating a mini greenhouse.
  • To work out if the cuttings have struck or grown roots, look at the bottom of the pot for root growth coming out of the drainage holes. If so, it's then time to plant them up into individual pots or even straight into the garden.

Rooted rosemary cuttings

Monday, November 11, 2013

Mullumbimby Living Earth Festival 2013

'These Boots are Made for Planting'


If you had ventured into our little town of Mullumbimby on the 1st of September this year you probably would have felt that not only spring was in the air but a real sense of hope (believe me, after the election result a week later we need it - for the first time since 1931 we have no Science Minister and one woman on the front bench - and that's just for starters)!  

Our community came together to put on an amazing celebration of all that is important to us as human beings: family, food security, mutual co-operation, sharing, music, wisdom of the elders, dance, fun and beauty - enough to put a smile on your face from ear to ear - the Mullumbimby Living Earth Festival for 2013 held in our Community Garden.

The program for the day was awesome - in the true sense of the word in that it inspired 'awe'.  How on earth was this going to be pulled off?  To say that what was planned was ambitious would be putting it mildly -  I saw a lot of very tired and harassed Committee members in the week prior to the event.  Needless to say the day was a huge success and, I could tell from all the comments that I received, that everybody went away feeling so glad that we live in this place where these things matter - where we can share, celebrate, be grateful and keep on learning.

It's was absolutely wonderful to see families and friends, young and old, walking around with shining, smiley faces. As Jerry Coleby Williams said to me (ABC Gardening TV presenter) "This place is more than just a garden; it's a sustainable food source, a seed bank, a source of wisdom and ideas - and the heart and soul of this community".

Program for the Festival


The day started with a very colourful and noisy street parade through Mullumbimby and my prize for the best 'float' (wheelbarrow) went to Rasa Dover from the Byron Hinterland Seed Savers for her spectacular effort as a seed fairy.  Rasa's work with Seed Savers epitomizes the tireless hours that countless volunteers put in for the mutual benefit of the whole community.  (If you are interested in seed saving/sharing you should get yourself a copy of the Seed Savers Manual by locals Jude and Michele Fanton - it's a treasure trove of wisdom, inspiration and knowledge)

My contribution was to be a workshop for children and the young at heart.  For two months I had collection points around the place for folk to drop off their old boots.  The idea was to fill them with potting mix and then plant them up with herbs.  I liked the whole concept of recycling old boots and using them as planters for something you could then eat - and the fact that they take up very little space - even folk with just a balcony or small courtyard can do this.  (Got old olive oil cans that you don't know what to do with - click here)


Everyone can grow herbs - people have been growing them for thousands of years and they are an important part of many cultures for their aromatic flavours and aromas as well as their nutritional and medicinal qualities. (Parsley is one of the most nutritious plants we have - click here to find out more)

A handful of fresh herbs on top of a meal often has more nutritional value in vitamins and minerals than the rest of the meal put together.


I have to give a special thank you to the following people for giving me support and helping to make the day such a success: Mullum Rural Co-op - for collecting boots and supplying potting mix; Byron Herb Nursery for all the plants; Sue Nelson at Mitre 10 for collecting boots for me and all the other folk who dropped off boots and last, but by no means least, - my family.  In all, we planted out and folk took home about 70 boots.  Well done!


“The world is so empty if one thinks only of mountains, rivers and cities; but to know someone who thinks and feels with us, and who, though distant, is close to us in spirit, this makes the earth for us an inhabited garden.” 
 Johann Wolfgang von Goethe

Friday, November 1, 2013

Peach Cake

Peach Cake

While many of my readers are hunkering down for the winter we, in Australia, are in the early days of summer - although you wouldn't know it because it is very dry and hot already - it has barely rained for four months and spring was a dream I had one night.

It does mean, though, a great season for stone fruit and I picked up a whole boxful of peach and nectarine 'seconds' for $4 yesterday.  As I had some unexpected little people for afternoon tea I thought I would make this quick and easy cake.

You don't have to use peaches - you can use apples, pears, rhubarb, plums, berries, apricots in fact, any kind of fresh fruit.

200 gm butter
1 1/2 cups soft brown sugar
4 eggs
2 cups wholemeal flour
1 tsp baking powder
2 cups sliced fruit (peaches)
1/2 cup chopped nuts (almonds/pistachios/pecans/hazelnuts)
1 tbs honey

1.  Preheat oven to 160oC
2.  Grease a 22cm spring-form pan and line the bottom with baking paper
3.  Cream together butter and sugar until light and fluffy
4.  Add the eggs one at time, adding a couple of spoonfuls of flour before the last egg (this stops it from curdling).
5.  Fold in the flour and baking powder.
6.  Pour into cake tin and cover with sliced fruit
7.  Top with chopped nuts and drizzle with honey

Bake for 1 hour, or until cooked (skewer comes out clean).  Serve however you like.  We had it with homemade yoghurt.
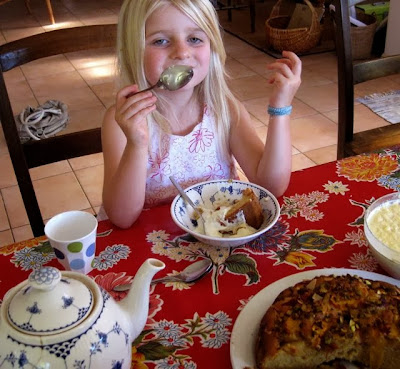
That is a very big piece, for such a little girl!