Saturday, March 31, 2012

Declining Bee Numbers and Pesticides

Hey farmer, farmer, put away that DDT now
Give me spots on my apples but leave me the birds and the bees (please!)

Don't it always seem to go
That you don't know what you've got til it's gone
They paved paradise and put up a parking lot
Joni Mitchell 1970
"Pesticides Linked to World Decline in Bee Numbers" 
It seems that we still are not learning the lessons.  In today's Sydney Morning Herald they cite an article that recently appeared in Science quoting findings from research into a relatively new class of pesticides called neonicotinoids.  Their findings showed  that these pesticides clearly have harmful effects on the activity of bees and beehives and may go a long way into unravelling the mystery of the wordlwide decline in bee numbers.

"Growing evidence for declines in bee populations has caused great concern due to the valuable ecosystem services they provide. Neonicotinoid insecticides have been implicated in these declines as they occur at trace levels in the nectar and pollen of crop plants. We exposed colonies of the bumble bee Bombus terrestris in the lab to field-realistic levels of the neonicotinoid imidacloprid, then allowed them to develop naturally under field conditions. Treated colonies had a significantly reduced growth rate and suffered an 85% reduction in production of new queens compared to control colonies. Given the scale of use of neonicotinoids, we suggest that they may be having a considerable negative impact on wild bumble bee populations across the developed world."
http://www.sciencemag.org/content/early/2012/03/28/science.1215025

Suggested reading for all Agro-chem bods - Silent Spring by Rachel Carson with Joni Mitchell's Big Yellow Taxi on replay.  I didn't think that when I was doing this in the 1970's that by 2012 it would be still be relevant or, indeed, necessary.

UPDATE TO THIS STORY - Good News!  This story from the Guardian Newspaper 29 April 2013 with the European Commission taking the lead on banning the neonicatinoid classes of pesticides.  Now we just need Asia/India/Americas and Australasia to follow their lead??


"Europe will enforce the world's first continent-wide ban on widely used insecticides alleged to cause serious harm to bees, after a European commission vote on Monday.

The suspension is a landmark victory for millions of environmental campaigners, backed by the European Food Safety Authority (EFSA), concerned about a dramatic decline in the bee population. The vote also represents a serious setback for the chemical producers who make billions each year from the products and also UK ministers, who voted against the ban. Both had argued the ban would harm food production."

Go to this link for the full story. http://www.theguardian.com/environment/2013/apr/29/bee-harming-pesticides-banned-europe


Saturday, March 24, 2012

Recipe: Sticky Date Cake

The March Garden - still raining!
MY FAVOURITE RECIPE BOOK:  I don't have a large collection of cookery books, but return over and over again to my favourites - top of the list is Stephanie Alexander's The Cook's Companion.  I like her mixing and matching of ingredients, simple little side recipes, use of Australian produce and the fact that the recipes invariably 'work'.

This recipe is one of them and is definitely on the 'comfort food list'.  It was a big hit at the last Garden Club meeting.  Easy to make and both the sauce and cake will keep in the fridge - I freeze half the sauce for the next one.  I have made it many times and it is very reliable.

You can eat it plain, without the sauce as an afternoon cake, or warm it and the sauce up and serve with ice-cream, cream, or vanilla'd yoghurt as a special desert.

Sticky Date Cake 


170g dates, stoned and chopped

1 tsp bicarbonate soda

300ml boiling water

60g unsalted butter

1/4 cup brown sugar

2 free-range eggs

170g self raising flour

1/2 tsp vanilla extract


Sauce:

400g brown sugar

1 cup pure cream

250g unsalted butter

1 vanilla bean, split
Preheat oven at 180C and butter an 18 cm square cake tin. 
Mix dates and bicarb soda in a bowl and cover with boiling water, leaving to stand while you continue. 
Cream the butter and sugar, then add eggs, one at a time, beating well after each.
Fold in flour gently, then stir in date mixture and vanilla gently. 
Pour into prepared tin and bake in the centre of the oven for 30-40mins or until springs back in the middle, pulls away from the edges and a tester comes out clean.

To make the sauce, bring all the ingredients to the boil, reduce heat and let simmer for 5 mins. Remove the vanilla bean and pour a little sauce on the cooked pudding and return to the oven for a minute to let it soak in.

NOTE:  This gives the cake a wonderful glossy coating.
Serve with extra sauce and cream/ice cream.


Sticky Date Cake


Tuesday, March 20, 2012

Nematodes and Companion Planting: Sorting Fact from Fiction

MARIGOLDS Tagetes patula 

"1 cup of soil contains 100 billion microorganisms"
ABC Radio National Science Show, 3 March 2012


WHAT ARE ROOT KNOT NEMATODES?  They are tiny parasites, invisible to the naked eye,  that burrow into the roots of plants leaving cancerous like growths that compromise the health and vigour of a wide range of ornamentals and food crops.

FACT Not all NEMATODES are bad - they perform a multitude of beneficial functions that contribute towards the health of the soil - what we are dealing with here are PARASITIC NEMATODES that can cause a tremendous amount of damage to food crops.

Parasitic Nematode damage to my tomato plants

Troubleshooting an unproductive bed (I'll leave the jokes to the wits out there!).


The Garden Troubleshooter!

I had one bed that was just not doing well - things would start to grow and then most would die or linger on looking unhappy.

The Companion Planting Theory - Sorting Fact from Fiction: In this bed I had planted MARIGOLDS amongst the vegetables to keep the nematodes at bay - this is the perceived companion planting wisdom. This was mixed up with tomatoes, broccoli, eggplant, climbing beans and wild rocket.

What I Discovered: All the tomato plants were failing to thrive, along with the beans and eggplant - while the broccoli, rocket and marigolds were unaffected.  
1. When I pulled up the sick tomatoes I saw that they all had these cancerous growths on the roots - the same with the eggplant and beans, but not any of the other plants.  2. The MARIGOLD roots were unaffected but this showed THAT THEY WERE NOT PROTECTING THE PLANTS AROUND THEM.
3.  What about the BROCCOLI and ROCKET, you might say? Doing a bit of reading around the subject I discovered that because these plants are both in the BRASSICA family, and they exude sulphur from their roots (the smell of boiled cabbage!!), which is probably what the strong smelling MARIGOLD is doing too (a bit like men wearing Brut?) - deterring the nematodes from getting too close to them.


Marigold roots unaffected by nematode damage


MARIGOLDS DO NOT PROTECT THE PLANTS AROUND THEM FROM NEMATODE ATTACK - JUST THEMSELVES.

How Can we Use this Knowledge to our Advantage?
1. NEMATODES will persist in the soil and keep causing damage if they have favourable host plants so having an understanding of plant families is going to be our best ally.
2.  EXCLUDE the plants that are nematode magnets and INCLUDE the ones that put them off.  Tomatoes and eggplant are in the same family (SOLANACEAE) so they are going - along with their brothers and sisters - potatoes, capsicum, chillies.  Make sure you destroy the affected plants and don't put them in the compost.
TOP TIP  Two effective ways to destroy diseased plants:
.  Put in a garbage bin full of water, with the lid on to eliminate mosquitoes breeding, and leave until they rot down then pour this slurry on the garden.
.  Place in a securely tied black plastic bag in the sun until decomposed - then put on the compost.

How to get this Unhealthy Bed Back Into Shape?
1.  Having a bed so badly affected by nematodes tells me that there is something out of kilter here.  When plants become diseased it usually means that they are under stress and, as usual, THE ANSWER PROBABLY LIES IN THE SOIL.

FACT:  The heavy rainfall that we experience over the summer months invariably leave the soils 'tired' and depleted of nutrients.  For the full story take a look at the page UNDERSTANDING SOILS.  You will find that they are often quite ACID and lacking in ORGANIC MATTER.  What to do?

STEP 1.  Do a pH test to determine the first step to take.  When I did a pH test in the 'not happy' bed I saw that, in fact, it was quite alkaline - about 10 when it should be between 6-7 (NEUTRAL - this the optimum level of acidity/alkalinity in the soil when microorganisms thrive and nutrients are released for root uptake).

I then realised that I had been topping it up with mushroom compost and have since discovered that a large component of mushroom compost is CHALK (calcium carbonate - very alkaline).

pH test of soil showing it to be quite alkaline - 10 - when it should be 6-7


STEP 2. I now realised it was time to empty out the compost bins, to correct this imbalance, and put it to good use.  I mixed up the COMPOST with some BLOOD and BONE, dried GRASS CLIPPINGS to give the soil an addition of ORGANIC MATTER and correct the pH - make it neutral - 6.5-7 is what we are aiming for.  

For acid soils (5 and under) you need to be adding all of the above plus some DOLOMITE or AGRICULTURAL LIME to raise the pH.

STEP 3. After pulling out all the affected plants we are now going to use the MARIGOLDS and their nematode deterring properties to fumigate the soil.  I simply pulled all the ones out that I had around the garden, chopped them up and left them to rot down on top of the soil - bingo - no more nematodes.

TOP TIP:  For an empty bed where you are starting from scratch and want to ensure that it is nematode free and is ultimately going to give you the healthiest FOOD -  PLANT A GREEN MANURE CROP of a mixture of MARIGOLD, MUSTARD (a brassica) and  LEGUME (fixes nitrogen on their roots) seed (e.g. vetch, cow pea, lupins), and a GRASS (e.g. barley or ryegrass - adds much needed organs matter and carbon to hungry soils).  When they are about 50 cm high, slash them down to the ground, cover with a thick layer of straw to deter further growth, wait for that to break down then plant away.  This is a centuries old practice for improving the health of the soil organically and without the need for chemical fertilisers.


Nitrogen nodules on broad bean roots.  Don't confuse this most desirable phenomena with the cancerous looking roots of a nematode affected plant.

STEP 4.  Put the kettle on!


“We know more about the movement of celestial bodies than 
about the soil underfoot.”  Leonardo Da Vinci, circa 1500’


Me doing Step 2.


Reference sources:  Hawaii University School of Agricultural Science.  Gardening Australia.  Queensland Department of Primary Industry.

“To be a successful farmer one must first know the nature of the soil.” - Xenophon, Oeconomicus, 400 B.C.

Wednesday, March 14, 2012

Capsicum: Cooking with Abundance

It's that time of year when we have a lot of ripening chillies and capsicum.  What to do with them?  I have already posted the Kasundi recipe for a fresh and spicy tomato chutney with green chillies but here we go with some Mediterranean flavours for rich red capsicum.
I find that cooking capsicum whole on a hot barbecue grill is the quickest way cook them through and char the skins so that they are easy to remove.

How and When to Grow Them:  Capsicum  are a warm season plant that grow all year round in tropical and sub-tropical districts - they are just killed off by cold and frost.  It is best to use local seed and plant late winter.  Happy plants will behave as perennials and keep going for a couple of seasons.

They are in the same family as tomatoes, eggplant and potatoes (Solanaceae) so don't plant all of these in the same bed as they take the same nutrients out of the soil and are affected by the same pests and diseases.  Mix and match with other families (see page on VEGETABLE FAMILIES)

Cooking with Capsicum:  Grilled and skinned capsicum can be used in a variety of dishes and once you have prepared them are easy to keep in the fridge, ready to use for a variety of dishes, or simply added as a garnish to a summer salad. 

Wait until the cooked capsicum has cooled, remove the central core and all of the seeds - the skin should be easy to peel off.  It's a bit messy, but don't be tempted to wash it under the tap or you will just be washing away all the flavour.  Just layer the peeled flesh in a jar and cover it with olive oil - bang it on the bench-top a few times to make sure there is no air trapped.  Seal and keep in the fridge ready for use (will keep for up to three weeks like this). 

See below for easy paella and grilled capsicum salad recipes.

Once they are cooked through, with the skin charred, the flesh takes on a beautiful  rich and smokey flavour.


Recipe: Paella

We're on a Spanish theme with two fabulous recipes that I cook when I have some grilled capsicum in the fridge.

Paella is a dish I have been making for many years and one that definitely improves with practice.  This is the poor man's version in the Catalan style.  Every region, every town and just about every family will have it's own, but this is mine.  It is best kept simple - with just a few ingredients - just make sure you use the best and fresh.

NOTE:  There is no substitute for a good paella pan and home made stock.

1 free range chicken, cut into 16 equal pieces (the flavour comes from chicken with bone in it)
Olive oil
1 large onion, chopped into small pieces
2 cloves garlic, crushed
1 can crushed tomato (or fresh if really ripe)
1 small handful of rice per person
NOTE:  Calasparra rice is best, but not always available.  Substitute with white medium grain - I find arborrio goes too gluggy.
1 litre+ good chicken stock
500 g cleaned mussels
Few strands of saffron
1 tsp paprika
1 cup peas
Salt to taste
Handful of grilled capsicum pieces

Fry chicken pieces in olive oil until golden, remove from pan
Fry onion until soft, then add garlic
Add rice and saffron, stir
Return chicken and add half of stock and can of tomatoes
Add salt and pepper
Cook until rice is just cooked with rest of stock.  Chicken will be cooked by then too.
In separate pan cook mussels until open, cook dry WITOUT WATER - their juices will come out when they open which gives the paella flavour, add peas.
When mussels are open add to paella and stir through

NOTE: It is sometime s difficult to get mussels to open if you add them to the paella raw - this way they are guaranteed to open properly and you still have their liquor to flavour the paella.

Adjust seasoning and serve decorated with strips of grilled capsicum.  Their smoky flavour gives an added dimension.

NOTE:  A crusty bottom to the paella is desirable, BUT NOT BURNT - this is where you tread a fine line.  The way I have overcome this is by freezing small containers of stock and placing one in the middle of the paella when it is cooking (Please don't read this Jamie or Nigella!)  This prevents the rice from burning while the iced stock slowly melts and prevents the rice from burning.  IT STILL HAS A DELICIOUS CRUSTY BOTTOM.


Recipe: Grilled capsicum salad

My oldest friend lives in Spain.  We went to school together in the UK, she married a Spaniard and lives in Barcelona with her four children and I married in the UK and came to live in Australia as a young woman.  Over 20 years ago we took our kids on a big tour of Europe and stayed with them in Barcelona. Now my friend Gillian is a good cook (the longest emails we send to each other are about food!) which she studied at College and is emersed in the culture and food of where she lives - Catalan country.

When we stayed with them the children had a late afternoon snack, which was either this recipe or fantastic slice of strong bread wiped with a clove of garlic, smashed and smothered with a succulent ripe tomato, drizzled with olive oil and sprinkled with salt - no vegemite sandwiches for this lot!.  OR, this delicious grilled pepper salad with crusty bread. I have been making it regularly since and is a real winner.

4 ripe red capsicum, grilled with the skin removed
(to see how - go to this previous post)
1 fat clove of garlic sliced
About ten anchovies
1 tbs capers (I use pickled nasturtium - see previous post)
Enough good olive oil to cover salad

Serve with good crusty bread and extra sea salt and black pepper.

Saturday, March 10, 2012

Topiary: Takes it to another level!

Doing away with beach umbrellas, Langkawi, Malaysia.
For anyone who is interested they are Tamarisk trees
Tamarix parviflora.  The same tree you will see growing on the beaches around the Mediterranean and in Australian gardens.  A fine, feathery and hardy small tree with pink flowers.

Wednesday, March 7, 2012

Citrus: Pruning and Planting


Some of the most frequently asked questions that come my way are about the care of citrus - mainly about pruning and pests and diseases. 
 Regular maintenance will go a long way to controlling common problems.

PLANTING: We are at the start of citrus season and just about every variety imaginable grows in my area - but to have healthy, productive trees a few simple guidelines should be followed.

  • Choose an open, sunny position, preferably north to northeast facing, with shelter from strong winds. Plant in late winter to early spring.  Chose the right variety for your area. (Check with your local specialist nursery for appropriate species.  Avoid buying from your local supermarket or hardware chain!)
  • A fertile, well-drained soil with a pH between 6 - 8 is best. Citrus are vulnerable to root-rot so care must be taken to avoid badly drained areas. Checking the pH of the soil is important so it can be corrected, if necessary, before planting. (see UNDERSTANDING SOILS PAGE)


FEEDING: If you feed your citrus regularly they will be healthier, more resistant to pest and disease attack and bear more fruit.

  • Citrus trees are very hungry feeders with high requirements. A regular foliar spray (liquid fertiliser applied directly to the leaves) with a seaweed based fertiliser will go a long way to providing the essential macronutrients of nitrogen, phosphorus and potassium + trace elements. SEE Making Your Own COMPOST TEA.
  • Citrus will also benefit from a tri-annual complete soil fertiliser in September, early December and March - after the rainy season; always water the tree well after fertilising. Never place non liquid fertiliser close to the trunk or in heaps, spread it as evenly as possible to just past the drip-line of the tree. Compost or animal manures are ideal.  For details on when and what to feed citrus go to this link and how to recognise deficiencies.

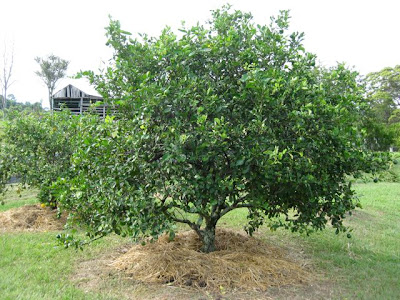
My lemonade tree after feeding it for a year - it's worth it!

WATERING: Citrus are thirsty plants.

  • If you neglect to water them during dry periods the fruit will also be dry. 
  • Continual water stress leaves the tree weakened and less productive.
  • Citrus need regular watering from flower bud formation through to fruit set to retain a good crop. Water stress is usually the cause of fruit drop.  Mulching will alleviate this.


MULCHING: Do not plant citrus (or any tree) in the middle of a lawn without having a grass-free mulched area out to the edge of the canopy.

  • Grass and weeds compete with your tree for water and nutrients - if left to grow  under the tree they also encourage collar rot of the citrus trunk 
  • Grass around trees also equals the dreaded whipper-snipper!  I have seen more young trees damaged and ring-barked by thoughtless 'whipping' than I have had hot dinners!
  • Wet newspaper, at least 10 sheets thick, can be used to kill weeds and grass under the tree and then topped with mulch regularly to prevent weeds returning. 
  • Always mulch past the drip-line of the tree as this is the area where most of the feeder roots are found.


TOP TIP:  A lot of folk have problems with brush turkeys and say that they are reluctant to mulch under trees for this reason - the critters just dig it up.  A way to overcome this is by planting a green manure crop in the mulch (they put back into the soil as well as anchoring the mulch) with something like nasturtium - non-invasive, hardy and very pretty.


Before pruning and mulching - note dry, cracked soil under tree and branches dragging on ground.

After. Branches pruned away from ground and mulched out to drip line.  This is the ideal height to keep a citrus tree.


PRUNING: Start to shape your trees from DAY ONE. It is very hard to make a silk purse out of a sow's ear - i.e. it is very hard to turn a ten year old unpruned, unloved tree into something beautiful, healthy and productive (a bit like people really!)

  • Prune in June or July before the spring bud burst in frost-free areas. In frost affected areas delay pruning until after the last frost. 
  • Remove dead or damaged branches, branches growing inwards and very low branches to improve air circulation. LIFT THE SKIRT. After pruning, the lower edge of the canopy should be 60 - 90 cm clear of the ground.
  • Shape the tree after harvest in early spring.


Citrus graft
A NOTE ABOUT CITRUS GRAFTING:  All citrus that you buy have been grafted.  This means that two different species of citrus have been 'cleft' together to make one plant.  Generally the 'rootstock' is Citrus trifoliate  (meaning-three-leaves) and is used because it is resistant to a soil born disease called phytophtera which, in the past just about wiped out the world-wide citrus industry.  The 'scion' or main plant on the top is the desirable species be it Seville orange, Eureka lemon, Tahitian lime etc.


If you look carefully at a citrus plant you can always see where it has been grafted - it's where the 'dog-leg' is!


Shoots that came from below graft
The photo on the left shows unwanted shoots of trifoliate which grew below the graft of my lemon tree- TAKE THEM OFF!  Most citrus will throw out a few of these unwanted shoots. A regular part of pruning maintenance is to remove shoots of trifoliata from below the graft as soon as possible, as they steal vigour from the tree and, if left too long, leave large wounds for disease to enter when they are cut.
They are viciously thorny so be wary handling them!


Aim to have mature trees no more than 2.5 to 3 m high. Higher than this just creates problems with harvesting and pest control. Larger trees are not more productive than smaller, well-managed trees. Once you have taken all unwanted branches you do not have to be too fussy about trimming the outer growth - most citrus growers just take a pair of shears to their trees!

A NOTE ABOUT WASP GALL DAMAGE:  You may notice these swollen lumps on citrus branches - make sure you prune these and destroy them.  This is the damage that the burrowing wasp gall makes - if left, they will weaken the tree and eventually destroy it.


Damage from citrus wasp gall.  Prune out of tree to prevent re-infection

NOTE:  By following these few simple guidelines a lot of the common problems citrus growers have will not occur - i.e better fruiting and less pests and diseases.