Monday, July 29, 2013

Date and Tamarind Chutney

One of my favourite places to eat in Sydney, particularly when it was cold and you needed something really warming, was the Maya Indian restaurant on Cleveland Street in Surrey Hills.  After a huge North Indian thali plate I would get some samosas for lunch the next day and they would always come with their version of this chutney - yummy!

This is a really easy and quick recipe.  I whipped up batch yesterday afternoon when I realised that we had run out (always the way) and I was cooking up some pakoras (Indian vegetable fritters) for friends who were coming over for dinner.  This chutney is just the perfect accompaniment for that kind of food and also things like pates, terrines, cold meats, all sorts of curries and my husband's favourite - cheese sandwiches.
Pakoras - Indian vegetable fritters


It doesn't require any onions, garlic or vinegar and the sour fruity taste of the tamarind goes really well with the sweet richness of the dates.
Stick blending the chutney until smooth


Date and Tamarind Chutney

1 cup seedless (block) tamarind, soaked for half an hour in one of the cups of water.
2 cup seedless dates
¾ cup palm sugar
1 cup brown sugar
6 cups water
3 tsp roasted cumin seed - grind after roasting
1 tsp chilli powder
1 ½ tsp garam masala
2 tsp salt
1 tbs grated fresh ginger

TOP TIP:  I find it easiest to grate ginger with a julienne grater that has a finger guard - it's done in no time at all without shredding your knuckles!

1. Put all ingredients together in saucepan.  Bring to boil and simmer for 30 minutes, stirring to avoid sticking to bottom.
2. Stick blend to smooth consistency
2. Pour into sterilized jars.

(Will keep for six months or so in the fridge - if it lasts that long!)

NOTE:  It's really easy to make your own garam masala if you have a spice grinder.  Freshly ground spices just have so much more flavour.  Here is a simple recipe that I used for this chutney.
Dried spices ready for grinding

Garam Masala

4 tbsp coriander seed
1 tbsp cumin seed
1 tbsp black peppercorns
1tsp fennel seeds
¾ tsp cloves
2 cm piece cinnamon
1 tsp whole mace or ½ tsp grated nutmeg

1. Toast all lightly 
2. Grind all to fine powder and store in air tight jar

NOTE:  There are just about as many recipes for garam masala as curry recipes - this is just one that goes well with this recipe.  Be adventurous - try your own?


Thursday, July 25, 2013

Fish Pie with Mashed Potato

A few chilly nights and I start thinking of comfort food - this dish certainly fits the bill - and it is so easy to make and very adaptable.  It's the kind of thing my mother used to make with smoked fish - like haddock.  I make it with whatever fresh and chunky fillet fish I can get at our farmer's market on a Friday morning - but you could use fresh salmon or add some prawns if you were making it for a dinner party (I'd probably use one of my fancier casserole dishes too!)
Di's Fish Pie

So many fish pie recipes involve a lot of different stages and consequently quite a few dirty dishes - with this one you make it and bake it in just the one pan - now, that definitely has to be a bonus!  Oh, did I say that it tastes delicious too?


FISH PIE WITH MASHED POTATO

500 g firm, white, chunky fillet fish (you can use salmon)
1kg mashing potatoes
75 g butter
1 leek, discard dark green part
celery, about half a cup, finely chopped (optional - you can replace the celery with bulb fennel)
2 desert spoons plain white flour
3/4 cup fish or vegetable stock
3/4 cup fresh milk
fresh parsley, finely chopped (about half a cup)
1 cup mixed peas and corn (optional)
salt and pepper
(extra butter and milk for mashing potatoes)
½ cup grated strong cheese or parmesan

Method
Put oven on at 190oC
Peel and quarter potatoes and put them in saucepan of water to boil until cooked.
While potatoes are cooking put butter in casserole dish and melt.
Washing and slicing the leek

Wash leek and celery and finely chop and add to butter.


TOP TIP:  The best way to wash leeks, to get all the grit out of them, is to slice them lengthways (as in the photo) and hold under a running tap - white part at the top - this way the dirt washes down and out.


Saute the leeks and celery in butter

Saute these until soft. Turn the heat right down.

Add the flour to this mixture and stir around until it all starts to stick together (this means the starch grains are bursting and will thicken your sauce – it’s called a roux and is the basis of most white sauces).
Place on a low heat and slowly add the stock and milk and combine thoroughly – do this carefully or it will go lumpy.
After a minute or so the sauce will begin to thicken.  You don’t want it too sloppy or the mashed potato wont sit on top.


Cut the fish into bite-size chunks and add to the sauce.
If you are adding peas and corn, put them in now.  Stir gently for one minute and turn the heat off. You don’t want to break the fish up and everything will finish cooking when you put it in the oven.
Adjust seasoning – I like white pepper with fish – add chopped parsley, stir.
Placing the mashed potato on the fish mixture

When the potatoes are cooked. Strain them and mash them with a little milk and butter and add salt and pepper – again, I like white pepper in mashed potato.
Carefully put small spoonfuls of potato on top of the fish mixture and then smooth out with a fork completely covering fish mixture.  Sprinkle with the grated cheese.

Smooth out the potato with a fork, sprinkle with cheese


Place in oven for about 20-25 minutes until top is golden

A few notes about this recipe.  Why leeks and not onion and maybe garlic?  I just think that the flavour and texture of leeks works better with fish - I find onion and garlic too strong in a creamy sauce - I don't mind it in tomato, Italian dishes.

I served it with sauteed cabbage, carrot and fennel - tossed in a hot pan with a little butter.  I just added some watercress at the end.


Fish Pie with sauteed winter vegetables

Sunday, July 21, 2013

Herb Gardens in Oil Cans


Herbs are an important part of our diet - it doesn't matter where you are in the world you will find herbs forming an integral part of culinary and medicinal traditions that are thousands of years old.
Herbs left to flower, like this dill plant are great attractors of insects and polinators.

Apart from the enormous variety of flavours, they are incredibly good for you - a handful of fresh herbs added to a plate of food will often contain more vitamins and minerals than the whole dish.  Think parsley and mint salads in Middle Eastern salads, coriander and basils in Asian dishes and oregano, basil, thyme and bay leaves in Mediterranean food - these are power packed with nutritional goodness.

HERBS can be divided up into three different types ANNUALS, BIENNIALS and PERENNIALS.

ANNUAL HERBS have to be planted every year and usually fall into the soft, leafy green variety - basil, coriander, dill and fennel.  These are easy to grow in a well mulched bed. - just plant  out seedlings in the springtime.

BIENNIAL the lonely, but very important parsley.  This takes two years to do its thing - grow leaves, flower, set-seed and die down. You can keep it going in the second year by pinching out the flowering stems as they appear.

PERENNIAL HERBS persist from year to year.  Some die down and then jump up again in the spring - like tarragon, yarrow, chives, comfrey and most the mint family.  But some stay around for most of the year - they just look happier in the warmer months - like the thymes, oregano family, sage, lemon verbena, rosemary and bay.

Flowering comfrey - where you need it - next to the compost bin!

In the sub-tropics, this latter group of aromatic herbs are a bit more of a challenge for us to grow as many of them originate in the Mediterranean with particular soils and climate - that is a free-draining soil and dry summers - neither of which we have.

For the first few years I lived here I would loose these plants every year in the summer wet.  Now, I have just copied the ubiquitous Greek olive oil can garden and everything is thriving!  Not only do I feel very virtuous about recycling these colourful cans, but I can move them under cover when we have a 'big wet'. - and for the past three years they have been thriving.
My olive can collection of herbs

It was time today - being late winter - to divide up some of these plants in the oil cans as they had become just too crowded and root-bound.  As I said to my neighbour today, unfortunately gardening is not like interior decorating - it is not finished even when the last wall has been painted!  Actually, propagating is just about my favourite job to do in the garden - there's something deeply satisfying about seeing new plants growing from seeds and cuttings.

TOP TIP: The larger cans in the picture above are actual olive cans and make perfect planters - they are larger than the oil cans and already have a hole in the top, you just have to put some drainage holes in the bottom.  Restaurants and cafes are usually happy to save these for you - especially in exchange for the odd potted up rosemary plant!

MAKING AN OIL CAN HERB GARDEN:

 Cut the top of the can with a can opener.
The top will be VERY SHARP so this is not a job for the kiddies.  WEAR GLOVES.


Punch some holes in the bottom with an old Phillips head screwdriver and a hammer.  (If you have a better way of doing this please let me know?)


This is a thyme plant that easily divided up into about eight plants with roots attached to each.  I re-planted two oil cans and put the rest into pots.


If you are planting rooted cuttings into pots it is easier to fill half the pot with potting mix and then lay the cutting on it's side - then complete filling with potting mix.  You may damage the roots if you try and force the plant into the pot of soil.


My newly potted up thyme plants next to a lovely Greek oregano.

TOP TIP:  When moving a plant or dividing one up and you damage some of the roots - usually inevitable - prune off an equal proportion of the leaf part of the plant.  For example, if you lose a third of the roots, take off a third of the top.

Saturday, July 13, 2013

Mullumbimby Food and Soil Festival 2013


For the past three years our Community Garden has held an annual festival and this year is going to be bigger and better than ever with both Costa Georgiadis and Jerry Coleby Williams from ABC Gardening Australia.

For the first time in many years this event will be held in conjunction with the Mullumbimby Chamber of Commerce and involve the whole town.  They used to hold an annual event with the highlight being a fun run up Mount Chincogan - this will be re-instated at next year's event.  Maybe we can get Jerry and Costa to join in that next year?

This years Festival starts with a street parade through the town starts at 10.30 am on 1st September (first day of spring!!). It will make it's way to the Community Gardens where there will be lots of workshops, demonstrations, food, music, dance (I have a special interest in the Bollywood Dance performance!) which will keep going until 10 pm.

There will be lots of children's activities.  I am running a workshop on the value of herbs and growing food in small spaces.  The kiddies will be able to get involved and take home a potted up herb in an old container - i.e. and old work-boot or wellie (if you have any, I would love them!!)

If you have never been to Mullumbimby before you are in for a treat.  Come along and enjoy this Community Celebration and I look forward to seeing you there.

Thursday, July 4, 2013

Bananas - Top Plants

Bananas in the back garden.
TOP TIP: This is one plant and needs reducing to three stems if I want it to keep producing good fruit.  This is the same for all banana plants.

Bananas are one of those really valuable plants for the backyard gardener - a cornerstone plant valued in many parts of the world for their versatility and nutritional value.

At a recent talk in our Community Garden in Mullumbimby ABC gardening presenter Jerry Coleby Williams listed them as a key plant for a sustainable future - along with yams, perennial spinach (like kang-kung and Aztec spinach) and pigeon pea.  When choosing any plants for the garden we should be adopting a Permaculture principle (or just plain old common sense!) - does this plant perform more than one function, does it grow easily in your area and is it relatively trouble free? Bananas certainly fit this bill.  What would you add to that list of cornerstone plants?  I know that I would have papaya, sweet potato, nasturtiums and lemon grass.
Bananas - a cornerstone plant in this Balinese garden along with sweet potato, lemon grass, cassava, water spinach, chillies, coconuts and amaranth

This is, in fact, how communities, who don't have access to supermarkets and industrialized food,  exist on staple foods that fulfill for them the above criteria.  Let me give you an example.  I was working in Bali, helping to design a kitchen garden and cooking school for a hotel in Candi Desa and I was given a list of plants I HAD to include by the head gardener.  Most importantly were the three pillars of Balinese life (that's how he described them) Coconut Palms, Bamboo and Bananas - from this everything else flows; their food, ceremonial offerings, construction materials, utensils, crafts etc.  Every family compound will grow them - they also of course grow rice, but not in the compound.

So with the banana you get the dinner and the dinner service, plus they are packed full of nutritional value, they taste fantastic, are incredibly versatile to cook with and the plants look fabulous.
When I was teaching in Bali we used to get lunch for the students my friend Darta's traditional Balinese restaurant.  They would arrive in a basket, each individually wrapped in a banana leaf, pickles and rice separately folded in a little parcel.  And..........when we had finished all the scraps could go straight in the compost!  When I first went to Indonesia in the 1980's they didn't have the plastic/rubbish problems that they have now for everything they served up just like this.

WHY ARE BANANAS GOOD FOR YOU?
One large banana packs over 600mg of POTASSIUM which I eat every day to ward off cramps.

They are high in FIBRE and  and are abundant in a range of VITAMINS and MINERALS: vitamins A, C - the range of B's (including B6) and Folic Acid.


On the mineral scale Calcium counts in at 9.2 mg, Magnesium 44.1 mg, with trace amounts of iron and zinc. 

Putting all of the nutritional figures together clearly shows the banana is among the healthiest of fruits.

DEPRESSION: According to a recent survey undertaken by the Black Dog Institute in Sydney amongst people suffering from depression, many felt much better after eating a banana. This is because bananas contain tryptophan, a type of protein that the body converts into serotonin - known to make you relax, improve your mood and generally make you feel happier.
Beautiful bananas emerging from the flower.

HOW TO GROW BANANAS?
Bananas have been cultivated for so long that they have lost their ability to reproduce by seed - and therein lies the dilemma - because of problems with disease (like bunchy top) it is illegal to give away suckers to friends and neighbours.  But, don't despair banana growers, who are registered to supply suckers, are usually happy to let you have a few - that's how I got mine.

THE BANANA IS A VERY INTERESTING PLANT.  The green stems above the ground are, in fact, pseudostems (otherwise known as 'peepers' (don't you love it?)) and the true stem is a rhizome under the ground from which all parts of the plant emanate - including the flowers (see above drawing - it's been raining a lot so I have a lot of time on my hands!)  You can now understand why it's important to feed and mulch around the banana roots?  

HOW DO THEY FRUIT?  The flower stem travels up through a mature pseudostem producing both male and female parts - the bell at the bottom is the male part and the part that produces the fruit are the female flowers at the top.  Bananas are unusual in the plant world in that they are parthenocarpic - there is no pollination - hence no seed.  Fertilization is stimulated by a phytohormone within the plant.
Male bell flower at bottom of flowering stem (this doesn't produce fruit) with female fruiting body at the top.

CARE AND MAINTENANCE  Once a stem has fruited it will not produce again so you should remove it.  They are very easy to cut down and make a marvelous bio-degradable garden bed edge.  A banana plant will keep on producing stems, but you should limit these to THREE per plant otherwise fruit production declines.

Bananas are very fast growers and put on a lot of leaf and they therefore require a lot of water - that's why mulching is important - it prevents them drying out while feeding them at the same time.  They respond well to regular watering with compost tea and mulching with comfrey leaves - they like a bit of extra potassium (potash) - otherwise they are pretty care-free.

BATS, RODENTS and BIRDS also love bananas and it may be necessary to cover the developing bunches with a banana bag.

WHICH BANANA?  The most commonly grown banana is the Cavendish in fact the botanical name for bananas is Musa cavendishii.  A popular variety of the Cavendish is the 'Lady Finger - next is the more stubby sugar banana.  The odd thing is that the Cavendish is a smaller growing plant and more suitable for the home garden than the taller sugar banana.
A home grown bunch of Cavendish 'Lady Finger' bananas fruiting at hip height - pick as you go?  I have already cut off hands from the top once they began to ripen.

WHERE CAN YOU GROW THEM?  Bananas are typically a plant at home in the tropics and sub-tropics. They are best suited to a warm, frost-free, coastal climate and usually grow well as far south as Perth and Sydney. They need all day sunshine and moisture. 

WHEN TO CUT THE BUNCH of  FRUIT? The bunch should not be left on the on the plant once they begin to colour - you can remove them one hand at a time.  The bunch is ready to pick once the bananas fatten out - i.e. they lose their angular shape and ridges - this is usually about four months from the first unsheathing of the bell.  If you leave the bunch hanging for too long the fruit tends to split.

NOTE: Something that Jerry Coleby Williams was very passionate about were plantain bananas - the kind you use for cooking things like curries and using as a carbohydrate substitute instead of rice, potatoes, and cereals etc.  If you're looking for cornerstone plants for the future he believes that this is just about top of the list.  To be continued..........


Wednesday, June 26, 2013

The Pinnacle - NSW Border Ranges

On the road to the Border Ranges with the beating heart of the Tweed Valley-Wollumbin (Mt Warning) majestically taking centre stage.

Yesterday was our 41st wedding anniversary and as we were feeling as old as the hills we thought we might go for a walk in them!  The last time we had been to The Pinnacle was over ten years ago and yesterday I was blown away - all over again - by this incredibly magical spot which has one of Australia's most spectacular lookouts.
Views from The Pinnacle around the edge of this ancient volcanic rim.


The Pinnacle is a rock - no wider than me with my arms stretched out - that is perched on the edge of an ancient volcanic region - a caldera that is one of the largest and best examples of an erosion caldera in the world.  The Pinnacle drops 1,000m from the edge of the caldera to the Tweed Valley with vast views to the Pacific Ocean and Wollumbin (Mt. Warning) - the relic core of this vast volcano looming up in the middle of this 20 million year old crater at 1,156m.
Wollumbin and the sea from The Pinnacle

This region is like being in the middle of a giant pop-up book of living treasures.  Today, this area forms  less than one per sent of what was the country's largest expanse of lowland sub-tropical rainforest.  Thankfully it forms part of the World Heritage Gondwana Rainforests of Australia and hopefully, what remains, will be preserved forever.

HOW TO GET HERE:  The walk up to The Pinnacle is an easy 10 minute walk from the Tweed Ranges Scenic Drive on the Road between Uki and Kyogle.  It took us about and hour and a half from Mullumbimby via Mt Jerusalem.  A good reference source for walks in the area is Bushwalking in the Rainbow Region by Michael Smith.

And, just when you thought that this might be enough for one day there are more treasures that await you just around the corner.

BAR MOUNTAIN:  You will have passed the turning off to Bar Mountain on the way to The Pinnacle - don't miss it.  WHY? You can take a 30 minute walk into Australia's Gondwanic past and see groves of the Antarctic Beech tree whose descendants live among us 80 million years later and are living reminders that this continent was once part of a much larger one that included most of the current southern hemisphere.  The Antarctic Beech Northofagus moorei is as old as the pyramids and live and breather before our eyes! 
Most rainforest trees, contrary to what you would think, are quite shallow rooted - spreading their roots into the rich mulch in the uppermost surface of the soil.  In high winds, massive trees like this just get uprooted and crash to the forest floor.

NOTE:  This ancient forest took a tremendous battering in the recent storms with huge trees wrenched out of the ground and  tossed around like matchsticks.  But, already the Northofagus, with its habit of coppicing (growing stems from the base of the parent tree) is persistently surviving with masses of seedlings growing up around these coppice circles. 
A coppiced circle of ancient Antarctic Beech surrounded by dozens of seedlings - the struggle for survival that is 80 million years old continues!

Another reason to take this walk is that you will probably hear one of natures best mimics  - the Lyrebird.  You can't miss it.  As we began the Falconstrum Loop (named after the Falconstrum orchid which flowers here in early spring - something I have to go back for!) we heard the call of about ten different forest birds - one after the other, all coming from the same direction and VERY LOUD - this is Albert's Lyrebird which can mimic just about anything - including chainsaws!

PLACE ABOVE THE HORIZON
Up here at The Pinnacle it is easy to feel uplifted and free from the stresses of daily life.
Below you in little houses and towns people are busy living and building a future.
Here as you stand on the edge of this vast view you behold the bigger picture - the life of a valley born in the remains of a volcano 20 million years ago.
(National Parks sign at The Pinnacle)


Sunday, June 23, 2013

Home Smoked Trout

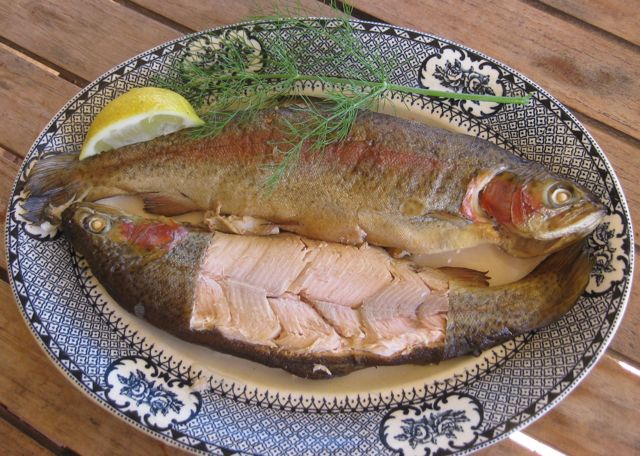
Yesterday I came upon some fresh trout at a third of their normal price and, of course, I had to buy them but I couldn't use all of them up at once.  It also seemed a waste to pop these beautiful fresh fish in the freezer - then I remembered a conversation I had a very long time ago with one of my daughter's friends.  Nick was always interested in food and went on to be part owner of one of the top cafe/eateries in Sydney, Single Origin.  Anyway, this particular day he was telling me about how to smoke your own fish at home in a wok using, as the smoking mixture, black tea, brown sugar and basmati rice.

I always thought that the process of smoking food would be incredibly complicated and time consuming, but no, it is really simple!   I have wanted to try it ever since then and it proved to very straightforward and quick - and we had beautiful smoked trout and poached eggs for breakfast.
Before smoking

This is a really easy way to make your own delicious smoked food.  As well as any kind of fish, you could use duck or chicken breast.  Experimenting with the smoking mixture is half the fun and I want to try adding to the tea mix some star anise and orange peel for the duck, and rosemary and thyme sprigs for the chicken - I'll let you know how it goes.

WHAT YOU WILL NEED
A wok
A cake trivet that fits snuggly just above the bottom of the wok
4 sheets of foil, to line the wok making sure you have some surplus at the top
A lid for the wok - I don't have one so I use a metal pizza tray
1/3 cup of basmati (or jasmine) rice, 1/3 cup black tea leaves, 1/3 cup brown sugar, mixed together - THIS IS THE SMOKING MIXTURE
After smoking

HOW TO MAKE IT
Line the wok with the foil
Put the mixed smoking mixture in the bottom of the wok and place the trivet over it
Lightly grease the top of the trivet (to stop the fish from sticking) and place the fish on top.
Have the lid ready, but don't put it on yet because you need to see when the mixture starts to smoke so you can time it.
Put the wok on a high heat - I use the wok burner of my barbecue and do it outside - just in case some of the smoke escapes.
As soon as the tea mixture starts to smoke seal the lid on the top with the foil and turn down heat to medium.
NOTE:  The smoke needs to circulate so don't have a lid that is too close to the fish.
Leave this smoking with the heat on for 10 minutes, then turn out the heat and leave for 5 minutes then remove the fish from the wok.  Don't leave the fish in the wok for any longer or the taste will deteriorate - think old bonfires!

NOTE: You can use any find of fish - whole or fillets.  If using fillets the thicker cuts are better.  Adjust the smoking time according to size, but always leave just for 5 minutes only after smoking.


Wednesday, June 12, 2013

Chelsea Flower Show - Aussies take 'Best in Show"


Image courtesy of Getty and AAP
Winning entry Australian Billabong Garden

The Queen, visiting the top prize winning entry of the Australian 'Trailfinders Gorge' garden at this years' Chelsea Flower Show in London in this, its centenary year. This was ninth time lucky for Wes Fleming (Flemings Nurseries) who with Melbourne garden designer Phillip Johnson came up with a billabong inspired landscape that reminded him of his childhood visits to the country - with rock gorge, gum trees, wildflowers, grasses and a 100 year old bottle tree (Brachychiton rupestris).  They set out to showcase the possibilities of sustainable landscaping within an urban setting. The billabong (small inland lake) and waterfall, that runs through the centre of the garden, was fed by water harvested from the roof of the BBC studio building and, wherever possible, they used recycled materials for the hard landscaping.  The sculpture like structure in the background was inspired by the beautiful red flowering waratah and doubles as a studio.

Why, you might ask, do I get excited by this and want to write an article about it?  Isn't it just a snobby kind of flower show for the Brits?  Well no, not exactly. Although the majority of exhibitors at Chelsea have always been British, there has been an international contribution ever since the first show in 1913, when the French rose growers Robichon had a stand. For an Australian garden to win is truly a wonderful achievement - and anything that puts gardening 'down under' on top is pretty damn fine!.  As Wes Fleming said 'I feel like the Usain Bolt of the gardening world'.
Trending at this years' Chelsea Flower Show - Allium sp. - ornamental onion flowers

Cate Blanchett (the actor) summed it up well in a recent radio interview when she was being asked about the local and international success of the Sydney Theatre Company, where she has been Artistic Director along with her husband Andrew Upton, when they wowed audiences in New York and London with the plays 'A Streetcar Named Desire' and 'Uncle Vanya' - with very flattering critical acclaim.  She agreed with the interviewer that Australia still seems to suffer from a certain amount of cultural cringe and Canberra (read decision makers) only seems to sit up and take notice when we have successes overseas. - only then does the funding start to flow a little more freely and more ambitious projects get the nod of approval.  Maybe this will change when Australia becomes a republic and our head of state is not 17,000km in Buckingham Palace.  The comedian Jerry Seinfeld made me cringe and laugh at the same time with this quote 'I love the Australian flag - Britain at night'!

So, if you are ever in London the last week in May - I highly recommend a visit.  As one German visitor was heard to say: 'This is the happiest day of my life'.  And, if you can't get to Chelsea go to some the other magnificent gardens around England like Great Comp, Kent in the photo below or Great Dixter in Sussex - and be inspired.

Great Comp, Kent - a magnificent and intimate private garden

NOTE: A strange thing happened on the way to the garden!!  We were in London last year while the Chelsea Flower Show was on.  The day before it opened my husband took me on a Magical Mystery Tour - the destination was to be a surprise.  We ended up here in Kent at Lullingstone Castle because he wanted to show me the World Garden that has been created by mad plant collector and gardener Tom Hart Dyke - this is his ancestral family home. (I saw him the next day commentating for the BBC from the Chelsea Flower Show!)


World Garden, Lullingstone Castle, Kent

Little did my husband know that I had been to Lullingstone many times before when I was a child.  About 55 years ago my primary school teacher used to take us kids, from the smoggy old city of London, for walks in the country and we would end up at places like this (there's also  the remains of a Roman Villa nearby).  I am sure these magical days out with Mr Cramp through bluebell woods and across fields of wildflowers, helped to sow the seeds of my lifelong love of the natural world - and gardening!  Being at Lullingstone after all that time was a very strange experience.

But, there were more surprises in store.I also did not know that my husband is distantly (very distantly!) related to the Hart Dykes and he had a grand old time wandering around as if he was lord of the manor!!

Lullingstone Castle, Kent


My husband especially wanted to show me this tomb in the chapel of Sir George Hart, knighted by Queen Elizabeth1 in 1587 - the chapel building pre-dating this period.  So we start this post with the second Queen Elizabeth and end with the first!

NOTE: The World Garden is laid out like a map of the globe and plants from every corner of it are planted where they were collected from - so as you walk around you are taken on a global botanical tour.  It's really well worth a visit.

In 2000 Tom Hart Dyke was on an orchid hunting trip in Central America when he was taken hostage by guerrillas - they thought he was a CIA agent.  In captivity he started to make a garden and was endlessly curious about the strange tropical plant world that he found himself in.  He thinks that his constant gardening, during this time,  and curiosity saved him - the guerrillas finally realised that he couldn't possible be a spy because he was obviously just plain loopy!


Monday, May 27, 2013

Ricotta: How to make from fresh milk

Tomorrow I am going to make a calcium rich cake (lemon, almond and ricotta) for the 'Stepping On' class that I help with  - it's our final session.  These are older folk that have had a fall or feel afraid that they might fall.  This is a serious scenario that affects the older age group,  their quality of life and ability to stay independent - something we all cherish.

Making your own ricotta, with a dairy farm of Jersey cows not far from me, makes common sense - and it is really simple (how that bloke gets up at 4am every morning to milk them is beyond me!).  However - thank you Mr. dairy farmer - and here we go!

2 litres fresh milk (8 cups)
250 gm plain yoghurt
Juice of one large lemon
Sea salt to taste

1.  Heat the milk in a heavy based saucepan to 90oc. (This is where you need a thermometer - see photo)
2.  Take off the heat and immediately lightly beat in the yoghurt and add the strained lemon juice and salt.  Stir a couple of times.
3.  The whey will separate from the curds.  Leave for about 15-20 minutes.
4.  Strain through fine large sieve lined with cheesecloth.  Drain for about 2 hours then refrigerate.
5. 2 litres of milk makes approximately 450 grams of ricotta (depending on the fat content of your milk)

Ricotta is a useful addition to lots of recipes.  Try these. (Simply click on the subject headings below and it will take you the appropriate page)
Berry and Ricotta Hotcakes 
Baked Mushrooms Stuffed with Ricotta
Strawberries and Ricotta on Toast for Breakfast (my favourite)
Baked Ricotta - delicious with home baked bread

And here's some other ways with milk:
Creme Caramel
Controlling powdery mildew on your veggies with milk!
And why not have a go at making your own yoghurt - it's easy

While we're at it - let's enjoy these beautiful camellias that I picked from daughter's garden - species unknown?


Friday, May 24, 2013

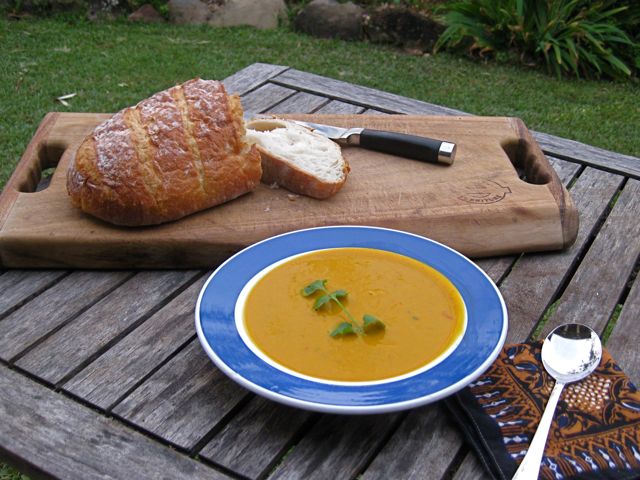
Recipe: Spicy Pumpkin and Coconut Soup

Dreamtime Beach, Fingal Head, NSW

Who left the freezer door open?  Suddenly we have gone from a day like this yesterday - where I had a beautiful swim at the beach - to a temperature drop of 10 degrees and freezing, lashing rain.  Soup weather?

I'm not a big fan of plain pumpkin soup - maybe because I wasn't brought up with pumpkin of any kind in the UK - people didn't eat it, it was fed to the pigs!  I remember trying to cook it when I first came to Australia as I saw it was a big part of the local cuisine.  Boiling pumpkin was not the way to go!  It took a long time before I tried it again and it became a different 'animal' after I roasted it - there's always a lot to learn!

This soup is simply delicious and easy to make.  A friend had given me a homegrown jap pumpkin that had a beautiful dense texture, deep orange colour and sweet nutty flavour - just what you want from a pumpkin.

It's also that time of year for harvesting ginger, turmeric, limes, chillies and coriander from the garden so a big pot of this soup steaming on the stove just makes sense.

SPICY PUMPKIN AND COCONUT SOUP

1.5 kg prepared pumpkin, skinned and cut into chunks
2 medium brown onions, cut into chunks
(these can be roughly cut because the finished soup will be blended)
2 large garlic cloves, crushed
1tbs fresh ginger, grated
1 tbs fresh, grated turmeric or 1 tsp dried powder
2tbs olive oil
2 small red chillies 
NOTE:  Put one in to start with and check for 'heat' - you can put it in, but you can't take it out!
1 tsp ground cumin
2 tsp ground coriander 
NOTE: It is infinitely better if these are freshly ground
1/2 tsp cinnamon
Sea salt to taste
1-1/2 litres water
400ml can coconut milk
Fresh coriander for garnish
Squeeze of lemon or lime juice (this is the secret ingredient!)

1.  Heat oil in large, heavy based soup pan.
2.  Saute onion and garlic, but do not let them brown.
3. Add ginger, chillies, cumin, turmeric and ground coriander and stir for a minute.
4.  Add pumpkin, salt and water.
5.  Put lid on and cook until pumpkin is tender - about 15 minutes
6.  Add coconut milk.
7.  Blend to smooth consistency with a stick blender (these are wonderful inventions!)
8.  Adjust salt, chilli and liquid - may need a tad more water - plus the juice of half a lime.
9.  Garnish with fresh coriander

GROWING YOUR OWN PUMPKINS

Pumpkins make a tasty and nutritious addition to many meals and are relatively easy to grow in the home garden - you just need a bit a space.  If you have limited space, one good way to grow them is over an arbour.  I saw this method to good effect when I was studying Permaculture at Crystal Water in Queensland - they used mesh fruit bags to hold up the weighty fruit.

Pumpkins (Cucubita spp.) are members of the Cucurbitaceae family along with zucchini, gourd, squash and cucumber. Technically a fruit, pumpkins have been in cultivation for more than 5000 years. This diverse group of frost-tender annuals and perennials has varied shapes, sizes, colours and patterns.  

Getting started
Pumpkin vines need fertile, compost-rich, well-drained soil in full sun and are most easily grown as ground-cover plants.  They are great in an orchard as a cover plant under fruit trees or in a part of the garden that is currently under-used (lawns!!).

In frost-free tropical and subtropical gardens, pumpkins can be grown all year round. In temperate Australia plant or sow outside after the last frost. Around our area they are grown as a late winter-autumn crop.


Diversity

The range of pumpkin varieties equals that of tomatoes. Golden Nugget is best for small gardens.   Jap pumpkin is best for sub tropical gardens.  Butternut can be grown just about anywhere.

Planting and growing
Pumpkin seed needs a soil temperature of 20˚C for germination. Raise seedlings by sowing them individually in 10cm pots and plant when pots are filled with roots. Alternatively, sow seed or plant seedlings into mounds of rich compost formed over loosened soil. Plants take 70–120 days to mature. As pumpkins are shallow-rooted they need regular watering in dry or windy weather. Even moisture helps prevent fruit splitting. I like to start them off in a circle of straw filled with compost.

Watering in the morning and spraying fortnightly with a solution of one part cows milk to 10 parts water helps prevent mildew. Mildew-eating ladybirds, which are patterned with yellow and black bands, help control mildew naturally. 

Harvesting and storing
Pinch out growing tips of rambling stems to contain plants. When fruits have finished swelling, remove them with as much of the stalk as possible. 


TOP TIP:  Ripe fruits with unbroken skin store very well if kept in a cool, dry, well-ventilated space. In fact, if you want a dense textured, rich tasting pumpkin you need to 'cure' it for a few weeks once you have picked it. Seed can be saved from fruit one month after harvesting them. Scoop seed from flesh, wash, dry and store in a cool, dry spot away from sunlight. 

Wednesday, May 22, 2013

The Golden Penda Spitfires

The Golden Penda

The street where I live is named after this beautiful tree - the Golden Penda which was recently in all of it's flowering glory after a particularly wet summer - it does best in the sub-tropics.

For all of you who have an aversion to 'proper' names for plants I might tempt you by telling you that it often holds the key to a beautiful description of the plant.  Take the Golden Penda Xanthostemon chrysanthus - which is Greek for golden flower with yellow stamens (xanthos - yellow, stemon - stamens, chrysos - golden, anthos - flower)*.  Having a love of plants takes you to all sorts of unexpected and interesting places - which leads me to these strange creatures that I found on a branch of the Golden Penda.


WHAT ARE THEY? The larval stage of a Perga species - otherwise known as sawflies - Aussie children know them as 'spitfires' because when aroused (as in the above photo) they raise up their rear ends and spit a yellowish liquid.  As they are generally found on eucalypts this can sting if it gets you in the eye.  This also tells me that the Golden Penda must come from the same general family as eucalypts  (Myrtaceae) for these creatures to have set up home on it's branches.

The eggs of this sawfly are deposited in slits in the leaves.  After hatching, the larvae remain in the same group, during the day, spread out over the tree to feed at night, re-assemble for the next day, and so on.  They leave the tree when fully fed and pupate in the soil emerging as adults - which is kind of wasp like.  The larvae really only do lasting damage to young trees and you would manage this by just pruning off the affected branch, mowing it up, and putting it in the compost! 

Yellow stamens, golden flower - the Golden Penda

WHERE AND HOW TO GROW IT  The Golden Penda is an Australian tree originating in the forests of south-east Queensland and is ideally suited to the sub-tropics (I never saw one in Sydney - too cold, not wet enough?).

It makes an ideal specimen or street tree which gets to about 5-7m.  It is has a compact, rounded canopy that really loves a good prune every now and again - other wise the branches can get a bit straggly.

It's quite drought hardy, but welcomes a good mulch - most of my neighbours just use grass clippings.
The nectar eaters moved in when it was flowering - the racket from the parrot orchestra was, at times, deafening - and then the bats moved in at dusk. (We actually had car loads of people driving by as word got round about this magnificent flowering spectacle - I can't wait for next year!)

* A fascinating reference book never far from my side: The Language of Botany, Debenham, C. published by the Society for Growing Australian Plants