Wednesday, March 18, 2015

Meringue - top tips for perfection!

It has taken me 40 years of trial and error, mostly error, to finally get this right so I thought I would pass on what I have learned about making the perfect meringues - it's really easy, once you know how - and it's really worth it!!


This all started because we were having a party and I had to make dessert for about 40 people - and I don't have a spare fridge.  It is forty years since we came to Australia with a suitcase, an eight month old and a dream for a brighter future!  We thought this was worth celebrating and I think that it is always the right time to be grateful - so party time it was!

Anyway, it was damn hot and numbers for party still very fluid - what to make?  This is where meringues come into their own.  WHY? They can be made in advance (up to three weeks), can be in any shape or size you like AND THEY DON'T HAVE TO BE KEPT IN THE FRIDGE - any airtight container will do, and you can, on the night, turn them into something impressive and delicious with a bit of fresh fruit and some whipped cream.  They were also in keeping with our Aussie theme - pavlova being a traditional Australian dessert - these were just going to be hand held ones to reduce the washing up.

MY TOP TIPS FOR MAKING MERINGUES
  1. Use the freshest eggs you can lay your hands on (cluck, cluck!)
  2. Have them at room temperature.
  3. Use very clean and dry utensils and don't mix in a plastic bowl (they absorb grease - which is bad for meringue making).
  4. Make sure the sugar is lump free.
  5. When you are separating the eggs, make sure that not a skerrick of yolk gets into the white.
And most important of all - DON'T OVER-BEAT.  This is actually your secret to success and where I have gone wrong before. Over-beating usually means that the meringues will end up soft and chewy with globules of caramelised sugar on the outside, instead of crisp and crunchy on the outside and a bit chewy in the middle.


Ingredients (this will make 15-20 depending on size)
4 egg whites
220g caster sugar
pinch of salt

Method
1.  Turn oven on to 150oC.
2.  Whip egg whites - electric hand-beater is best - until they begin to form soft peaks - now STOP beating.
3.  In a steady stream - with beaters on low - pour the sugar slowly into the egg whites (this is where an eager grandchild with a promise of post bowl-licking comes in handy!).
4.  When the sugar is combined, increase the speed to high and whip again until soft peaks form then STOP.  It doesn't matter if the meringue is still a bit grainy from the sugar.
5.  Spoon onto trays lined with baking paper (what did we do without this stuff?)
6.  Make a little nest in the middle to later accommodate cream/fruit/grated chocolate filling.
7.  Bake in oven for 35-45 minutes.  Meringues should be firm to touch.  Turn off oven, open door and leave meringues in oven to cool.
8.  When completely cool, store in airtight container until needed.


Serve with whipped cream and fruit.  Last year for Easter I thought I would do a different take on Easter eggs and made 'egg' meringues with poached peaches and passionfruit - they were pretty good.  For the party we had them with strawberries and mango - a bit of chocolate flake on top would have been even better.


Easter meringue eggs.  This batch were not as good as the perfected recipe above - they broke up really easily - not that anybody complained.

I have very few gadgets in my kitchen but one I couldn't do without is a simple electric hand beater.  This one was bought for me as a wedding present 43 years ago and has certainly seen a lot of whipping and beating, but finally telling me its' sentence was served and going up in a puff of smoke during its' last outing.  My knew one has an LCD display panel, timer, 14 speeds and very annoying beeping - can anybody tell me if this is progress and I seriously doubt that it will last for 43 years but, then again, I won't either.


My 43 year old Phillips electric beater - sadly now deceased.  I wonder if anyone has an older working appliance?

TOP TIPS FOR MERINGUE
  • Make them any size you want!  They can be the size of a plate and piled up to make a pavlova.
  • We recently went to a Turkish film and dinner night at our local community hall and my clever friend, the chef, had turned meringue into tiny minarets - stunning and yummy!
  • Heard of Eton mess?  Well, it's just broken up meringue, fresh berries and whipped cream in a glass dish - easy eh!
  • And don't worry about wasting the left-over egg yolks - turn them into: omelette, fritata, creme caramel or custard for trifle.

Monday, February 16, 2015

Climbing Plants - Greening Vertical Spaces

The vertical spaces in a landscape are often ignored, but when you walk into a garden that has used climbing plants wisely, another dimension is added that is often breathtakingly beautiful,  that lifts they eye and heart 'upwards' and 'over' instead of just 'along'.

Pyrostegia venusta - used in my neighbours' garden to cover an ugly fence and create a self-supporting archway.  This is a good climber to use if you want a plant that is green from the ground up - often climbers have bare stems at ground level.  Beware - this plant is very vigorous and needs diligent maintenance.

One modern incarnation of vertical landscaping is the increasing popularity of green walls in our cities and urban spaces -  where architects are beginning to realise not only the environmental benefits of greening whole buildings, including roof spaces, but also the beneficial impact of their visual beauty.

Gardens of the Acropolis Museum, Athens.  This otherwise ugly wall in the background building formed part of the boundary of new Museum gardens - what to do with something like this sticking out like a sore thumb - green it.

Climbing Plants for the Home Garden
Success with climbing plants comes with an understanding of how they climb - do they twine, do they have tendrils or suckers, do they scramble and have thorns, and then matching the right plant with the correct structure for them to climb over  - this is your key to success.  


Epiphytic orchids (they don't need soil!) used to create an arbour - to stunning effect - in the Singapore Botanic Gardens.  Who would have thought to use orchids in this way? (You could do the same with small bromeliads - they are also epiphytic)

For example.  Plants with tendrils; Passiflora sp. (Passion flower and fruit), Pyrostegia venusta (Orange trumpet creeper) and everything in the climbing peas won't grow just up a pole - their tendrils need something to cling onto.  Conversely, plants that like to twine need a pole to climb up and won't be very happy with a piece of mesh, these include: Wistaria sinensis (Wisteria) Vigna carracalla (Snail Vine) and Trachelospermum jasminoides (Star jasmine).  Then we have the scramblers - often with thorns - these need a wall or arbour to climb over or against and constant attention to keep them in check e.g. climbing roses and bougainvillea.  So, one size does not fit all!

Three different ways I have used climbers in my garden:
Passionfruit (Passiflora edulis).These are climbing plants with tendrils that need support to cling on to.  I needed something to reduce the amount of sunlight coming into my bedroom and in our outdoor dining area, which is next to it.  I chose Passionfruit because; it has tendrils so I could train it to go exactly where I wanted it to, a clear trunk at the bottom that would not impact on the rest of the garden bed, it has lovely glossy green foliage, beautiful flowers and the added bonus of delicious fruit.  I simply tacked some plastic lattice to the underside of the eaves where I wanted the vine to grow - the tendrils did the rest!


Snail Vine (Vigna carracalla) . This is a twining plant - like every climber in the bean family.  What I needed for this job was a plant that would twine itself over an arbour that leads down to the lower part of the garden.  I wanted something that was really beautiful, preferably with a fragrance, because this is a focal point in the garden, and not too vigorous - i.e. something I could control because the frame of the archway is quite small.  This is where deciduous climbers come into their own.  Because they loose their leaves in winter they give a seasonal shape to the garden and also makes them easy to prune to the desired shape.  PS this plant has the most gorgeous fragrance and the stunning flowers really do look like little snails.

Use of deciduous plants -  lightbulb moment: I actually really got switched on to the joy of gardening when I was sitting in a class, right at the beginning of my horticultural studies, and we were exploring the use of all kinds of deciduous plants and realised that you could use plants, not only for their beauty, but for passive light and heat control.  Think of a beautiful wisteria vine over a pergola in summer providing a cool, shaded and scented place to sit, and then in winter allowing the light and heat of the winter sun to penetrate through its bare stems.


Bougainvillea: These are scramblers with arching canes and hooked thorns - they need support.  I have a brick pathway that leads to the back of the house so I wanted to create a beautiful entranceway that lead they eye to the back garden, and something that I could  train with horizontal supporting wires, keep flat against the wall and that wouldn't impede the path.  (This is the garden art of espaliering - often used to train trees and shrubs flat against the side of a building or as a living fence).

It was also facing west so keeps pretty hot and perfect for a bougainvillea - flowering for most of the year - and I could have my favourite Scarlet O'Hara.

To maintain it I just have to cut off any stems that are poking out at right angles over the path, and any that are climbing onto the roof.

To encourage repeat flowering: give a light prune after flowering; feed and water then but do not OVER WATER and FEED while it is in flower otherwise it will just put on a lot of foliage at the expense of the flowers. 

Because of their stunning flowers most people would dearly love to have a bougainvillea in their garden, but can I give you a few tips about where to plant them that I have learned from experience?

  • Only plant bougainvillea against a support.  DO NOT PLANT IT IN A SHRUB BORDER - because, before you know where you are, you will have a thirty foot thorned giant that nobody will want to deal with.  My son is an arborist and, from experience, refuses to take these monsters out for people who have randomly planted them and then regretted it.  We have both had nasty THORN experience!
  • Plant only in an OPEN, SUNNY position against a wall/fence that gets the hot afternoon sun otherwise THEY WILL NOT FLOWER
  • As with all climbers - PRUNE to shape right from the BEGINNING because it's hard to correct this once it is mature.
Bougainvillea make fantastic POT PLANTS and seem to thrive on being a little pot bound.  If you have ever been to Bali you will know what I mean because they have been used to stunning effect along the roads around the main airport.  They also graft really well and you can end up with an impressive specimen with several varieties on the same plant!


I wonder which came first - the door or the bougainvillea?

GREENING VERTICAL SPACES - How to choose the right plant?

Case Study - Jo and Justin's wall?

The Clients:  My young friends Jo and Justin have recently moved into an inner city terrace in Sydney, gutted the whole place and been renovating - no easy task with three children under five!  This is their tiny, narrow back yard dominated by a rear brick wall and bordered by a path that provides access to a side lane-way on the right.  It has good light - facing north-west.

They have already started to tackle the garden, laid some grass and put in a raised veggie bed and eventually they want to 'green the wall' - but at the moment it is being used for other purposes!  It's not an urgent job so they have plenty of important time to THINK about it.

What are the Constraints?
  • It has to be beautiful because it is the focal point of the whole house and garden.
  • Anything planted cannot grow out too far otherwise access along the back pathway will be compromised.
  • Cannot use anything not 'child friendly' i.e. noxious, allergenic or have thorns.
  • Preferably a useful plant (edible?) to maximise the limited space.
  • Must be suitable for their climatic zone (warm temperate/sub-tropical) - no square pegs in round holes please!


What are the Choices?
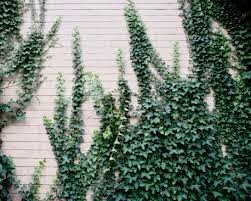
1.  Well, if you never wanted to paint the wall again you could use ivy - which has suckers along the stem that adhere themselves to the brickwork - that way you would not have to erect a support frame or wires. 

It is also a very hardy plant tolerating neglect however,  as you can see from this picture, it is not entirely maintenance-free and would require regular pruning to keep it flush against the wall.

Ivy (Hedera sp.) comes in variegations and different shades of green.


2.  Using espaliered citrus trees - thorn-free varieties - and maybe one for each of the children?  Plant selection is a matter of personal choice, but I would probably chose citrus varieties with smaller leaves (to give a denser cover) and definitely ones you are going to use e.g. lemon, lime, mandarin, kaffir lime, calamondin and cumquat.

These will require regular feeding and maintenance, but I think the rewards of creating a beautiful wall that is wonderfully fragrant in the springtime and provides an abundance of fruit might just outweigh that?

For a uniform effect the same species would have to be used (as in the lemon trees above), but you could use different kinds of citrus, just making sure that you planted the tallest in the middle.


3.  Star jasmine (Trachelospermum jasminoides) is a firm favourite with year round glossy, green leaves and a fantastic display of fragrant star-like flowers in the springtime.  This is a very hardy plant, tolerant of city pollution and easy to shape.

The stunning effect in the photo is easily achieved by stringing stainless steel wires from the ground up, to whatever height you want, then placing an individual plant at the bottom of every wire.

Of course it will need trimming and training to shape, but I know that Jo and Justin have a ladder!


4.  My last suggestion suitable for this situation is the fabulous Magnolia grandiflora - like the citrus suggestion these are not, in fact climbers, but can be used to grow flush against the side of a building again with espaliering techniques.  They have been used to stunning effect like this in European gardens for centuries and you will see them everywhere in the warmer Mediterranean countries greening the walls of glorious old buildings.
Again with glossy evergreen leaves, rusty coloured on the underside, they produce beautiful saucer-like, fragrant flowers with a heady citrus/gardenia perfume.

Certainly using a plant like this will require maintenance, but that is the case for whatever you chose.  Gardening is not like interior decorating - it is not 'finished' when it is finished!


Greening Vertical Spaces  - a summary. Choose the right plant and support for the situation (not the one that took your fancy at Bunnings!)

Thursday, February 5, 2015

Potato, pea and mint salad

One of the positive things about my passion for food is sharing recipes  with people - often in the most surprising of circumstances - and being connected to those people every time I cook up one of their dishes, but sometimes the boot is on the other foot!

I can't actually remember where I got this fantastic potato salad recipe from, but I know that it has become a real family 'go to' dish and that I have shared it with lots of other people - and sometimes being reminded of that in the most delightful way.


Sharing story 1: We had a few friends round for dinner the other night and just as I was serving up this potato salad a dinner guest said, "Di, have you seen this?"  He was browsing through a cook book given to me for Christmas by the author and my neighbour Belinda Jeffery - and there on page 30 was this recipe I had given her (acknowledged of course).  It's a fabulous cookbook and there isn't one dish I wouldn't want to try - and her pictures are much prettier than mine.


Potato, pea and mint salad
1 kilo of good waxy potatoes, boiled with their skin on until they are just cooked
1 cup of peas, steamed
1 bunch fresh mint leaves
1/2 cup sour cream
1/2 cup mayonnaise
Chopped spring onion, about a handful
Salt and pepper

1.  Put the cooked peas, sour cream, mint and mayonnaise in a blender and process until combined.
2.  Put the cubed potatoes in a serving bowl with the sliced spring onion
3.  Add the pea mixture with some salt and pepper.  That's it.  Nutritious and simple

(Belinda added topped it with some crispy bacon - also yummy!)

Sharing story 2:  I was visiting Sydney the other day and doing what I usually do - going for a swim - this time at one of my favourite places, Bronte Beach. It's now nine years since I moved away, but there are still many familiar faces sitting around the ocean pool and one of them is Fireman John - a retired fireman who has been swimming there for as long as I have.  We got chatting and I found out, sadly, that his wife Jan had died last year.  Now John is in his seventies and one of the things that he had never done is cook and now he has to - and I must say with a great sense of achievement and a little pride.  He told me that he used to tell his wife "You do the shopping, I'll pay for it and then I'll eat it".  Now he was telling me that he had cooked a batch of blueberry and walnut muffins before he came out because he had the family coming round for tea.  Anyway, I thought he would like this recipe - most men like potatoes - and it goes with lots of things so I wrote it on the only piece of paper I had in my bag - an old shopping docket.  I was thrilled to get this text a couple of days later.  "Hi Di, made potato salad using your recipe and included some bacon pieces and a few boiled eggs for show - everyone loved it"!


Bronte Beach, Sydney

Thursday, January 8, 2015

Gravalax - home cured salmon

A big welcome to all me readers, faithfuls and first-timers for a wonderfully happy and healthy 2015 with fabulous food and gorgeous gardens.  I think that probably a good way to start it off is with my horoscope for the year that a friend sent on to me  - she knows me very well!

Gemini 2015:  "You've tried being normal, that didn't work - now just be yourself"


Home made gravalax is a dish that never fails to impress, and yet it is so simple to make, wonderfully versatile and simply delicious to eat.  Coming from the Nordic culture of food preservation it is traditionally served on rye bread with a mustard and dill sauce.


It was our annual street party last night that involves taking a chair, a bottle of something cold and a plate of food to share,  so I decided on some blinis - little leavened pikelets topped with cured salmon and sour cream.

How to make Gravalax?
500g thick cut, fresh salmon with the skin on - you can use fresh trout too.
1/4 cup of vodka
1 bunch of dill or fennel fronds roughly cut
1/3 cup sea salt
1/3 cup brown sugar


1. Mix the curing ingredients together in a non-reactive dish
2. Lay the salmon in, skin side up
3. Cover in cling film and weight it down with something heavy on top.  Leave overnight.
4. In the morning, turn the fish over and return to fridge for another few hours.  Don't leave longer than 24 hours.
5. When you are ready to use it, scrape the fish clean and dab with paper towel to remove any excess curing stuff.  DO NOT WASH!
6. Cut into thin slices down towards the skin.  Left whole will keep for up to a week in the fridge.
NOTE:  You may need to remove any bones with a pair of tweezers - I find this easier to do after it has been cured.  After curing the salmon will take on a richer colour, firmer texture and more translucent quality - as you can see!
TOP TIP:  For an even more sensational colour - add some grated fresh beetroot to the curing mix.


How to Make Blinis?
1/2 cup buckwheat flour - can use wholemeal or rye
1/2 cup strong white flour
1 egg
About one cup of milk - can be buttermilk or mixture of milk and yoghurt
Salt to taste
1 tsp yeast

1.  Mix everything together and leave to rise for 1-2 hours in a warm place - should be a spongy batter
2.  Heat non-stick pan and add a little butter
3.  Cook in small batches, using small spoonfuls, until lightly golden on both sides.
NOTE:  Blinis are a traditional Russian dish, originally served with caviar and sour cream.

Assemble topped with little dollops of sour cream mixed with capers and chopped dill.  I actually used pickled nasturtium seeds - they have wonderfully pungent taste - a bit like horseradish, which is the traditional topping for salmon blinis but mostly unavailable where I live.  Anyway, they tasted sensational and were gone in about five minutes!


NOTE:  Curing salmon this way gives you something very versatile, economical and yummy to keep in your fridge to have on sandwiches or turn into a sophisticated salad - my favourite being with warm potatoes, chopped spring onions, hard boiled eggs and a salad dressing laced with mustard and pickled nasturtium seeds - oh, I forgot, a sprinkle of dill.

Sunday, December 7, 2014

Kasundi - Spiced Tomato Relish


I first posted the recipe for a version of kasundi about three years ago - when it was totally knew to me - and hooked on it's spicy yumminess I have made it many times since.  With Christmas around the corner and a need for something delicious to go with all those leftovers AND a top homemade gift, I decided to give it another go - with my usual 'tweaking' of the ingredients to see if I could improve upon the first recipe; the taste of which was great, but I found the consistency a bit runny - by blending the garlic, chillies and ginger first to make a thick paste I found it remarkably improved.


If there is one thing I have learned about living in the sub-tropics it's about growing tomatoes - unlike every other place I have lived in - they are not a summer crop here; too wet, too hot and too many bugs, but find a the right spot in your garden and you can grow them for a good nine months of the year, right through winter, until late spring.  I harvested the last of my crop for the kasundi, but you can just as easily use canned tomatoes.


The taste is fabulous - rich, pungent and spicy and great with eggs, curries and rice dishes - and especially pakoras (Indian vegetable fritters) Easy to make this relish will keep, unopened in the fridge, for six months or more. The quantity of the ingredients may seem a little excessive - have faith, it works!  I thought the number of chilles was going to make it far too hot so included less to start with - I ended up adding more because it wasn't pungent enough - 30 it is!


4tbs peanut oil - or other vegetable oil (not olive)

4tbs black mustard seed
2 tbsp turmeric powder
4 tbsp ground cumin
30 small green chillies, seeds removed
NOTE: Do this with disposable gloves on!
12 garlic cloves, peeled
125g fresh ginger, peeled and chopped
1 1/2 kg ripe tomatoes, chopped (or canned)
1tbs salt, approx.
250ml malt vinegar
125g brown sugar 
4 tbsp smoked paprika

Method

1.  Place the ginger, garlic, chillies and 50ml of the vinegar in a food processor and puree to smooth paste.
2.  Heat the oil in a wok, add the dry spices and cook on a medium heat for five minutes - being careful not to burn them.
3.  Add the ginger paste and cook for further five minutes.
4.  Add tomatoes, sugar, salt and remaining vinegar and simmer for about an hour.  When the oil comes to the top it is ready.

Kasundi is the perfect accompaniment to homemade cauliflower and eggplant pakoras.  Check out the recipe. Having people over - then this is the perfect snack with a glass of something cold.

Friday, November 14, 2014

Pasta with tuna, lemon and rocket - singing pasta

This pasta dish is one of those things you can go to when you haven't got anything for dinner as you will find that you probably do have most of the ingredients anyway; those staples in the pantry like canned tuna, spaghetti, frozen peas and a lemon.

It's become my standby dish and everyone loves it anyway - it's in the top ten requests from the family - and so quick and easy to make.

As spring has sprung in the garden I would rather be out there than slaving away in the kitchen and singing pasta has become my standard 'after a day in the garden' dish - satisfying, tasty and easy.

I first saw a variation of this, many years ago, in a Qantas inflight magazine by and Australian woman who ran a cooking school in Florence.  This is what she served the arriving participants.

Like all simple dishes it's the quality of the ingredients that counts - which seems to have filtered down to my children as my son-in-law recently told me that he very quickly learned that only Sirena tuna and Barilla pasta should go in the trolley when he was doing the shopping.  (He also now knows to buy local Australian extra virgin olive oil and check the date when it was pressed - fresh is best!).  When I actually think about this it's mildly scary - have I become one of THOSE mothers and mother-in-laws?

Why singing pasta?  Well, the flavours sing in your mouth; the zing of the lemon, sweetness of the peas, hit from the chilli and the rocket just cuts through the oily flavour with it's slight bitter edge.

What you will need for 4 people:
400 g can Sirena tuna in oil
500 g packet Barilla pasta No5 (or any other good quality dried pasta - don't use fresh for this)
1 cup frozen peas
Zest and juice of one fresh lemon
Fresh rocket, about a handful
White whine, about half a cup
Extra virgin olive oil, about a quarter of a cup
Parmesan cheese, finely grated
NOTE:  This is one of those dishes that breaks the unwritten rule of no parmesan in pasta dishes with fish - see what you think?

Optional extras which I nearly always add; capers (I use pickled nasturtium seeds as a substitute) and a finely sliced red chilli - because I like chilli in everything.

Method:
1.  Put on a large pot of salted water for the pasta.  When it is boiling add the spaghetti and cook until al dente.
2.  Put the tuna, zest of lemon (reserve the juice), wine and oil in a saucepan and bring to simmer - add capers and chilli at this stage too.  
3.  Add peas and heat through.  DONE.  Don't overcook.
4.  Place the fresh rocket in the bottom of the colander and strain the pasta over it - the idea is to just wilt it.  Flick the rocket through the spaghetti with a fork.  Tip into a wide serving dish.
5.  Adjust seasoning of tuna mix - may need extra salt - and pour over pasta and stir through.
6.  Squeeze over lemon juice and top with finely grated parmesan cheese.

Am sure that this would taste even better on a balcony in Florence with a view over the Duomo but buon appetito anyway.

Monday, November 3, 2014

Elderflower Champagne

I don't know if you have ever used yourself as a guinea pig - well I'm doing that right now and feeling decidedly squiffy!  I am trying the first batch of my elderflower champagne and it tastes pretty sensational.  If this post trails off you know I have keeled over!


I am fascinated by all things that can be made by hunting and gathering ie FOR FREE and, in this case, a delightful and refreshing bubbly drink (alcoholic?) made from flowers growing in every wild hedgerow in my neck of the woods and, I suspect, in many other parts of the world too.  Elderberry was certainly part of every hedgerow when I was growing up in the UK and seems to be having a revival with elderflower cordial cropping up all over the place in food articles and celebrity chef programs - it has a distinctive and delightful taste.  I think too that it is all part of the challenge and thrill of making something fantastic from wild food - I know for certain that it is deeply embedded in my DNA.

The Elderberry bush (Sambucas nigra) has long been used for making all manner of drinks, jams and relishes but I was inspired to make this after watching a episode of the TV program of River Cottage with the fantastically resourceful British gardener and chef Hugh Fernley Whittingstall.

On a brief look through my cook books I have found at least 30 recipes for using either Elderberry flowers, buds, green fruit or mature purple fruit.  Elderberry wine was certainly a common tipple in post-war Britain and my father was a master 'weird' wine-maker with earthen-ware crock pots bubbling away in our airing cupboard full of the next toxic brew.  Maybe he was just looking, like me, for the challenge of making something for nothing but I vividly remember tastings of tealeaf 'saki', potato peel vodka and one spectacular brew of rhubarb and ginger wine that exploded and seeped through the ceiling to the sleeping neighbours underneath.

What you will need: Makes about 7 litres
1 very clean bucket
A quantity of very clean bottles that have a stoppered lids (because this can GO BANG!)
15 elderflowers, freshly opened with no brown bits on them.
500 g caster sugar
2 lemons, zested and juiced
2 tbsp white wine vinegar
6 litres filtered water (don't use chlorinated tap water)

Method
1.  Put the sugar in the bucket and dissolve it with 2 litres of the water that you have heated.  Let this cool.
2.  Put the remaining 4 litres of water in the bucket along with the zest and juice of the lemons, the vinegar and the elderflowers and give it a stir.

NOTE:  It's important that you don't wash the flowers because they contain the flavour and yeast that you need for the fermenting process.  However, you may need to flick out the odd critter that floats to the surface.  Trust me, I'm a cook!

3. Cover with a clean cloth and put in a cool, dry place for 48 hours.
4. Strain the mixture through a muslin cloth and bottle-up straight away.  That's it!.

NOTE:  On the River Cottage forum on this topic Hugh clearly states that the brew does not have to show signs of fermenting before you bottle it - it WILL HAPPEN because of the yeast in the flowers!  And he was right - bubble away it did after about day 3.  I put a heavy blanket on top of the crate (stored in the garage) afraid that the whole lot would go off like gunshot in the middle of the night  - this hasn't happened so far.
5.  Put the bottles in a cool dry place for two weeks when you can start to drink it - and apparently will keep up to a year.

So this was it after day 18 - absolutely smashing.  Effervescent, flowery and refreshing, but I think I better go for a lie down!

NOTE:  Specific details about what sort of temperature and conditions to brew this champagne to maturity are hard to come by - all it says is cool??  We have just experienced some very hot weather when my garage got to over 30oC and it still worked so good luck and salut!

Thursday, October 23, 2014

Lime-Papaya Meringue Pie

If you have followed my recipes before you will know that I always endeavour to cook things that are easy to make, delicious and with ingredients that are the freshest and cheapest around. This is all of those things but you will just need to put aside a little more time for this one but, believe me, it is well worth it - it's something I make for special occasions as everyone just loves it.  Out to impress - well this is the pie for you!

I got the ispiration to make this from recipes of two of my favourite cooks Belinda Jeffery (Desserts) and Janet de Neefe (Bali-The Food of my Island Home) - in fact I think I ate something similar to this is Janet's restaurant Indus in Ubud, Bali.  I was looking to make a dessert to go with an Asian inspired meal and this perfectly fitted the bill - it's very similar to the traditional lemon meringue pie with just a tropical twist.  It helped that I had just harvested fresh limes and papaya from my garden and had happily accepted yet another dozen fresh eggs from my neighbour who has very happy and productive chooks.

NOTE: The filling is a lime-papaya curd.  Cooking a 'curd' often calls for a lot of time consuming stirring over a double-boiler which you don't need to do with this recipe - it all goes in together (I'm trying to make it simple!).

SHORTCRUST PASTRY
200 g (11/2 cups) plain flour (I use wholemeal - that way I'm trying to pretend it's healthy)
30 g icing sugar
150 g chilled butter, roughly chopped
1 egg yolk (save the white - you will need it for the meringue)

LIME-PAPAYA CURD
250 g peeled and seeded red papaya, chopped (not yellow pawpaw)
200 ml water
200 g white sugar
1/2 cup cornflour
125 ml fresh lime juice
zest of two limes
100 g unsalted butter
3 eggs PLUS 2 egg yolks (save the white for the meringue)

MERINGUE
3 egg whites that you have saved
100 g caster sugar
pinch of sea salt

TO MAKE SHORTCRUST PASTRY
1.  Preheat oven to 180oC
2.  Put the flour and icing sugar in food processor and blitz to combine.
3.  Add the butter and blitz until the mixture resembles fine breadcrumbs.
4.  Add the egg yolk and blitz until dough combines into one ball.
5.  Turn out onto lightly floured surface and knead briefly then press lightly into disc.
6.  Cover in plastic wrap and refrigerate for 20 minutes.
7.  Butter a 24 cm loose-bottomed pie tin or fluted quiche dish.
8.  Roll the dough on a floured surface to shape of pan then lay inside.  Trim off excess.
9.  Line pastry with non-stick baking paper and fill with pastry weights; I use dried beans.
10.  Bake for 15 minutes.  Remove the paper and weights, return to the oven and cook for further 5 minutes.  Remove from oven and cool.
TOP TIP:  Do not use foil for this - it will stick to the pastry.

NOTE: This is called baking blind and is pre-cooked in this way to ensure that the pastry is cooked through and does not go soggy when the filling is added.
TIP:  I always make a double batch of pastry and freeze half of it for next time.

TO MAKE THE LIME-PAPAYA CURD
1.  Put papaya, sugar and water in food processor and blend to fine pulp.
2.  Put the cornflour in a saucepan and mix to a smooth paste with a little of this papaya juice, then add the rest of liquid and stir to combine. DON'T PUT THE HEAT ON YET.
3.  Lightly beat the whole eggs and yolks and pour into saucepan, whisk in.
4.  Add the lime juice and zest.
5.  Melt the butter and add that too - stir to combine.
6.  NOW PUT THE HEAT ON LOW and whisk constantly until mixture thickens and cook for further minute to ensure cornflour cooked properly (otherwise it will taste floury)
7.  Pour into cooked pastry case and let it cool before adding the meringue.
TO MAKE THE MERINGUE
1.  Preheat oven again to 180oC
2.  Put the three saved egg-whites and pinch of salt into a clean, dry bowl and whisk until. they form stiff peaks.
TIP: Meringue won't work if the utensils are slightly wet or dirty.
3.  Add the sugar gradually until you get your peaks back.
4.  Spread the meringue over the pie right to the pastry edge. Use the back of your spoon to make fancy swirls - remember, you are here to impress!
5.  Bake the pie for 10 minutes or so until the meringue is golden brown.

Did I mention that it is worth the effort and absolutely delicious?

Friday, October 10, 2014

Barm Brack - Cold Tea Cake

This is one of my mother's recipes that came in her wide ranging fruit cake repertoire. It's one of those nourishing, old-fashioned kind of fruit cakes, well, a cross between a bread and a cake really - just what was needed for a weekend away camping.  You might find it a bit strange because the dried fruit is soaked in cold tea, but you will just have to go with me on this one.  It ends up being very moist and delicious and keeps for a good few days - if you are lucky.

Originating in Ireland, versions of it crop up all over the northern part of the UK probably in the necessity for filling the up the family as cheaply as possible.  The brack comes from an old Irish word meaning speckled - and you can see why!

I love it because it's so simple, quick to make and tastes really good; and there's a bonus NO SUGAR - apart from the natural sweetness of the dried fruit - and it's the kind of cake that cries out for a smothering of butter and a cup of tea.

Recipe
1 cup currants
1 cup sultanas
2 - 3 cups cold tea (fruit should be well covered so that it can get to juicy plumpness)
30 g butter, melted
2 eggs, lightly beaten
3 cups wholemeal self-raising flour
1 tsp cinnamon
1 tsp freshly grated nutmeg
Zest of one lemon

Method
1.  Put dried fruit into a mixing bowl, cover with cold tea and leave overnight
2.  The next day, grease a large loaf tin and put oven on 180oC
3.  Lightly beat eggs
4.  Mix everything together with soaked dried fruit in mixing bowl.
5.  Turn into loaf tin and bake for 60 to 80 minutes until golden and skewer comes out clean.  Remove from oven
6.  Leave in pan for about 20 minutes before turning out and let cool completely before cutting.
NOTE ABOUT COOKING THIS CAKE:  You don't pour off the tea after you have soaked the fruit in it.  However, the fruit should have soaked most of it up.  If you have a lot of excess, strain some of it off into a jug and see if you need it once you have mixed all the other ingredients in.  The mix should be soft - not sloppy or stiff.  Hope this helps. Now, all that remains is to put the kettle on!  Or the billy in this case.  Our camping spot in Mebbin National Park with the most incredible, ancient fig trees - so big you could live in them and hundreds of years old.

Saturday, October 4, 2014

Chicken Cucina - A quick and nutritious pasta dish

Short of time, cash, patience and ideas for dinner - then this is the dish for you.  The ingredients are simple and cheap; cooking time is as long as it takes to boil some pasta; it ticks all the boxes for nutritional content; adults and children alike love it AND it's delicious.

I've called it Chicken Cucina, but I'm sure the Italians must have thought of it first and have a traditional name for it - please let me know if it rings a bell.  

For four people you will need:
1 free range chicken breast cut into thin slices
1 tbsp olive oil
Pene pasta
1 cup sliced fresh mushroom
2 cups broccoli florettes (I made it with peas in the one above because I didn't have any broccoli)
2 cloves garlic, crushed
1 long red chilli, thinly sliced (optional)
1 handful of freshly chopped marjoram (or basil if you don't have it)
About 350 ml tomato passata
1/2 cup fresh cream (I think you could use plain yoghurt as a substitute)
Splash of dry white wine (optional)
Freshly ground salt and pepper
Handful of fresh chopped parsley for garnish
Grated parmesan

Method
1.  Cook pasta in boiling salted water until al dente then strain; steam the broccoli above the cooking pasta water until just cooked then refresh under cold water and set aside.
2.  Heat oil in large heavy based pan.
NOTE: This is important: if you use a small pan the chicken and mushrooms will become soggy in their juices and not take on those lovely stir-fried flavours, instead they will be more like a stew.
3.  Flash fry chicken until the strips take on some golden colour - don't overcook.
4.  Add mushrooms, chilli, garlic - keeping the pan hot, toss around
5.  Add the tomato passata (wine) and cream and turn heat down to gentle simmer.
6.  Add broccoli and season with salt and pepper to taste.
7.  Stir through chopped marjoram (or basil)
NOTE:  Marjoram is one of my favourite herbs for all kinds of Italian cooking; it has a lovely aromatic sweet nutmeg smell and flavour.  If you don't have it fresh then use basil and a pinch of freshly grated nutmeg.
DONE!  Now just toss the sauce through the cooked pene and top with a little fresh parsley and some freshly grated parmesan cheese.  As you can see, this dish is very adaptable - I just leave the chillis and mushrooms out if I have any little ones for dinner - not their favourite things.


Marjoram (Origanum marjorana), often confused with oregano (Origanum vulgare), shown in the photo above growing alongside a pot of bush basil (Ocimum minimum); all easy to grow in a warm climate. Marjoram is more often used fresh in cooking and oregano dried or part of a marinade.  I like to have them in pots close to the house and move them around when it gets too wet or too hot.

NOTE: Adding a handful of fresh herbs to any meal infinitely adds to it's nutritional value.  See previous post all about parsley.